E35: Island Snow with Bootstrap 5
In this trilogy of WODs, you will use Bootstrap 5 to create a page similar to the home page for Island Snow. When finished, your page should look like this (click to see full size):
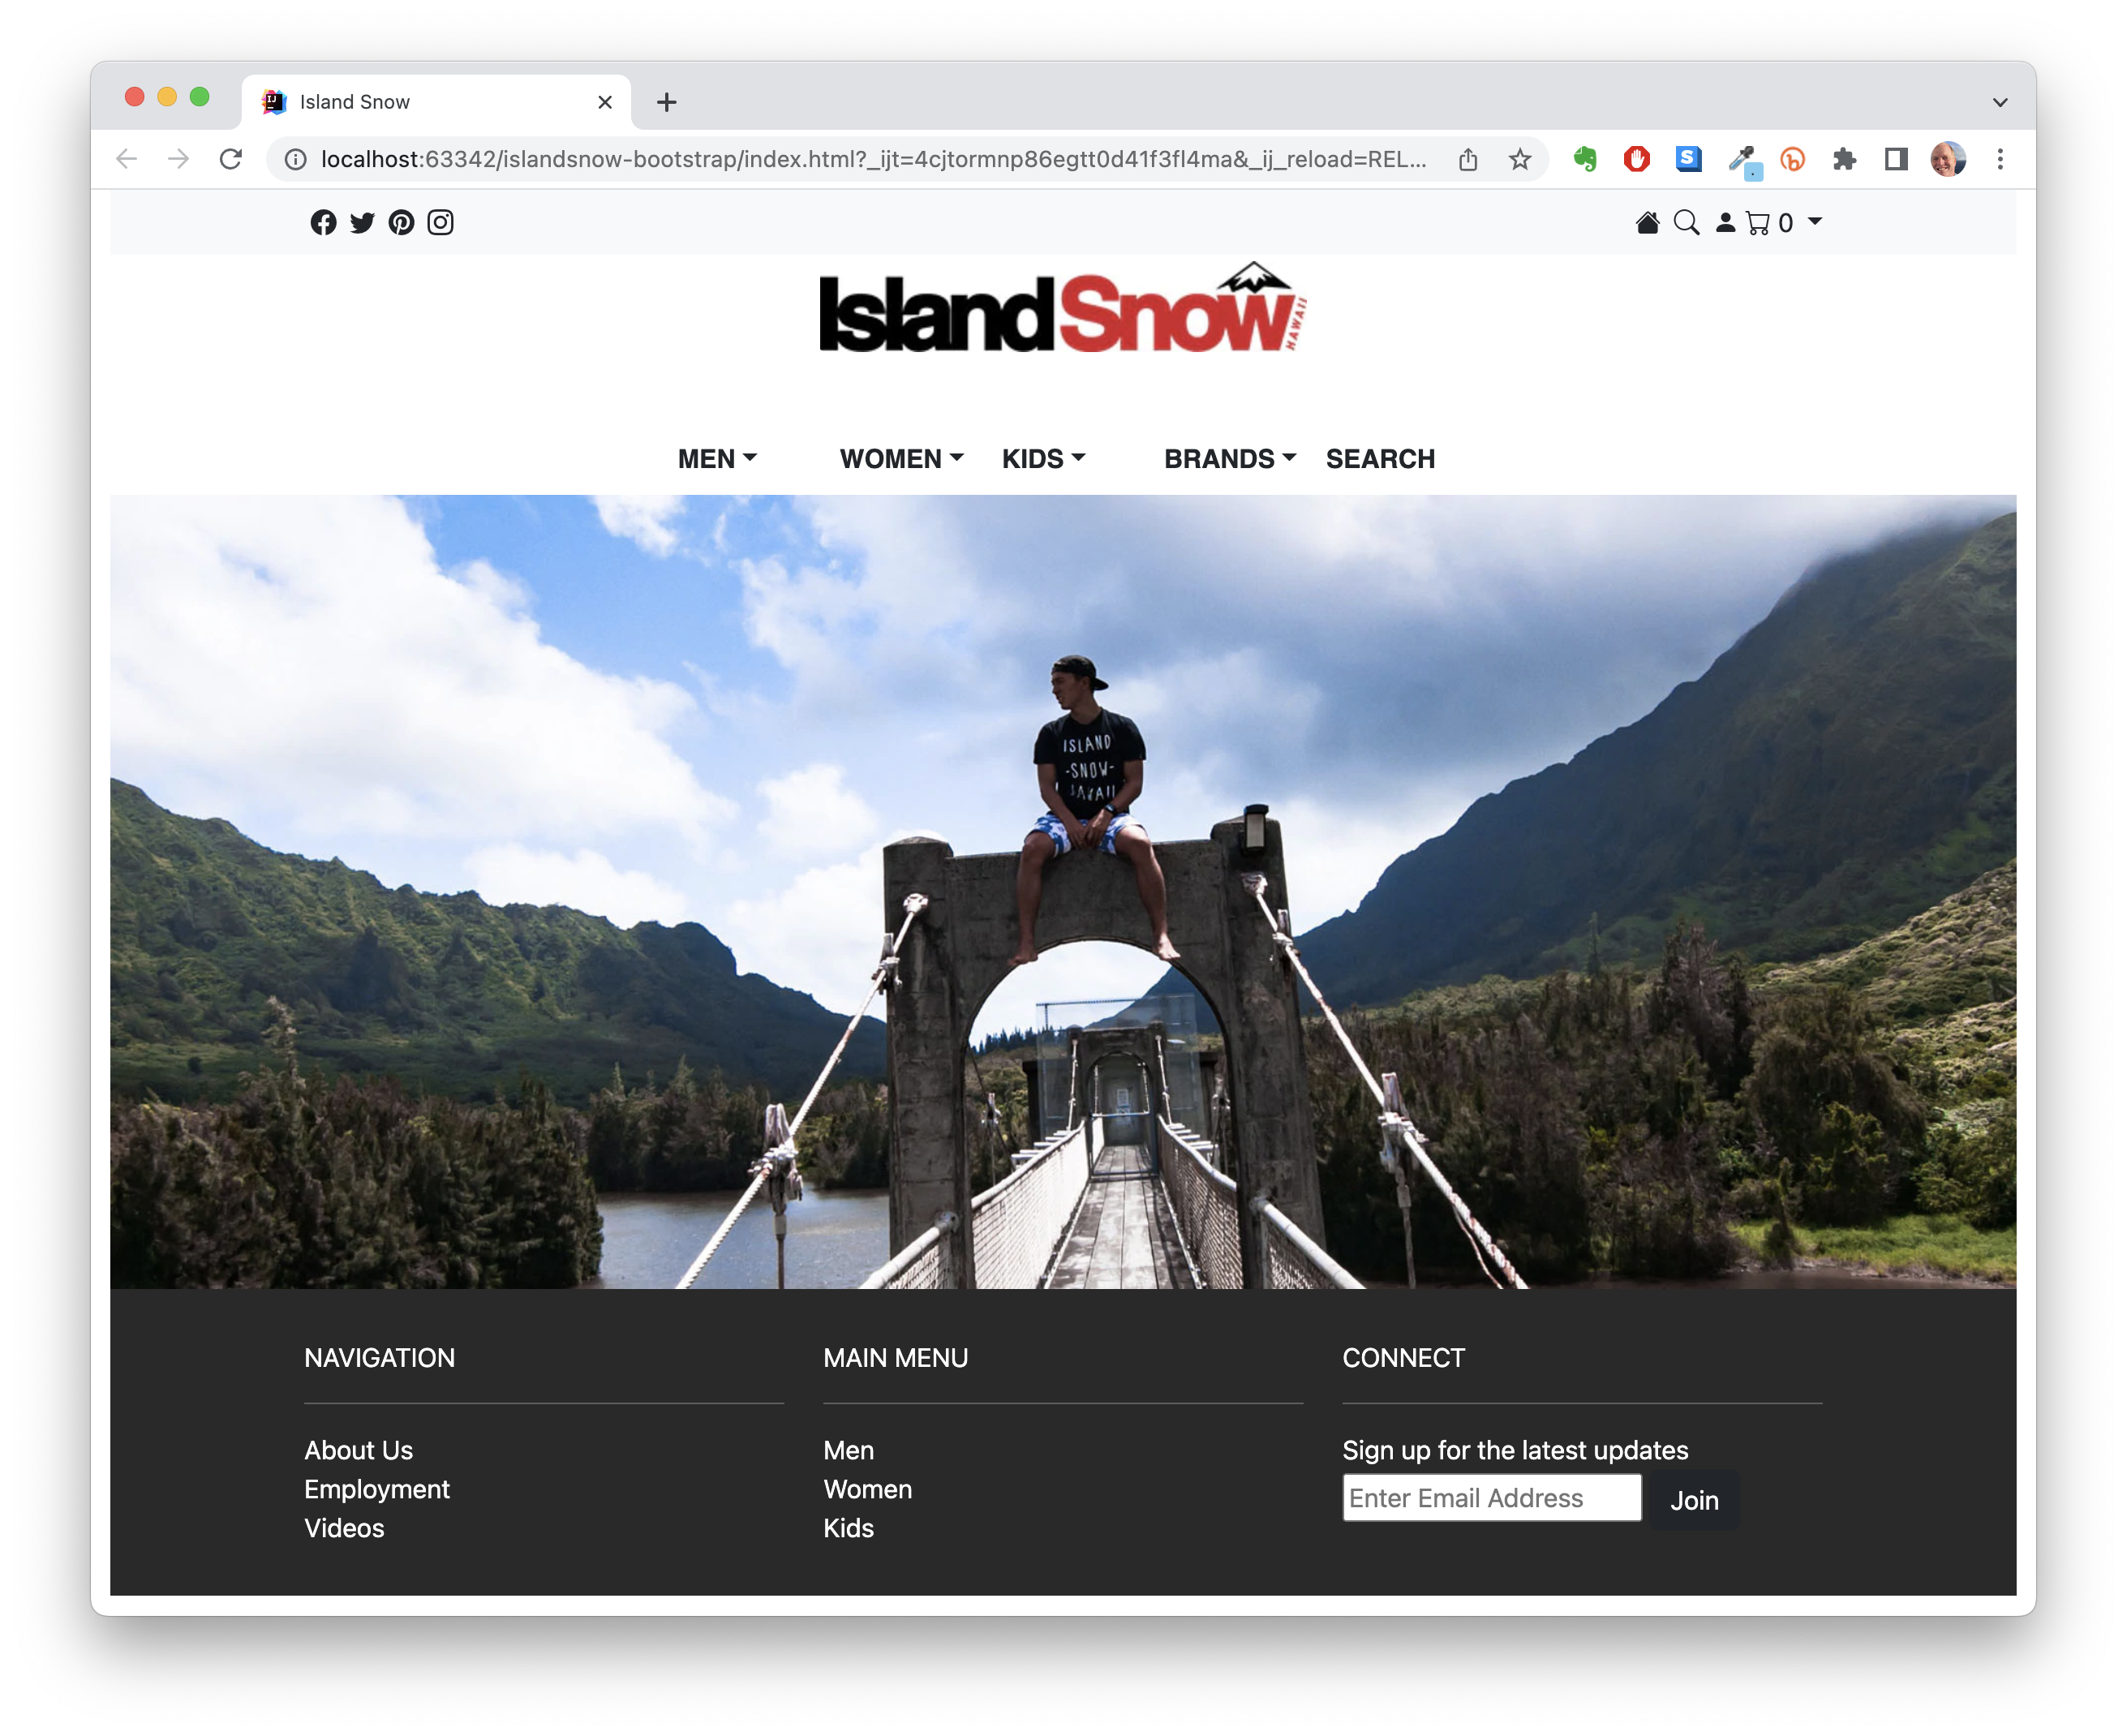
As you can see, there are several differences between the “real” Island Snow site and the one you are creating:
- Instead of a video on the home page, we provide a picture.
- The fonts are slightly different
- The icons are slightly different
- The spacing and margins are slightly different
- I’ve omitted several of the “middle” sections of the real Island Snow site
- My picture has a MyCart dropdown menu, which isn’t in the real site.
- The forms and links don’t actually work.
The goal of this exercise is not to create a pixel-perfect replica of the Island Snow site in Bootstrap 5 (although that is certainly possible). Instead, the goal is to help you learn the process of reimplementing layouts using Bootstrap 5. This capability is useful, since it enables you to incorporate layouts from sites you find attractive into your own projects.
To help you learn this more easily, I will create the page incrementally in three WODs. Each will only take you a few minutes to complete.
WOD 1: The top menubar
-
Start your timer.
-
Create a GitHub repository called islandsnow and clone it to your local file system.
-
Create an IntelliJ project called islandsnow in your repo, and two files within it: index.html and style.css.
-
Download sample.gitignore into the project directory, and rename it to .gitignore.
-
Load the Bootstrap 5 files into index.html following the instructions in Bootstrap 5 Hello World.
-
You will want to load the Bootstrap icons using:
<link rel="stylesheet" href="https://cdn.jsdelivr.net/npm/bootstrap-icons@1.11.1/font/bootstrap-icons.css"> -
Load the (currently empty) style.css file in index.html.
-
Convert the navigation bar into a Bootstrap 5 Navbar. The menu elements should link to the appropriate places in the text as before. Hints:
- Use
navbar bg-lightfor the navbar. - Wrap the menu in a
containerto create margins. - Create a
ul class="nav"to hold the icons on the left-hand side of the top menu. Add ap-1padding to each of the icons. - Create a second ‘ul class=”nav justify-content-end”’ for the second set of icons on the right-hand side. Add a
p-1padding to each of the icons. - Use the Bootstrap 5 Dropdown module to create the My Cart menu item.
- Use
-
Check to see that your page’s top-level menu looks similar to the one in the screen image above.
-
Now commit your main branch to GitHub, and check to see that it’s there.
-
Stop your timer and record your time. Be sure to record it, because you will need your WOD time data when you write your technical essay.
Rx: <20 min Av: 20-25 min Sd: 25-30 min DNF: 30+ min
If you need to repeat WOD 1, just delete your repo and start over from scratch.
Once you’ve finished doing WOD 1 a single time, watch me do it. Note that this video was developed when the Island Snow site had a slightly different design, but the idea remains the same:
WOD 2: The middle of the site
-
Start your timer.
-
Create a branch of your islandsnow repo called “middle-1”. Do your work in this branch.
-
Wrap the Island Snow logo in a
rowdiv and a singlecoldiv to place the Island Snow logo underneath the menu. You can get a copy of the Island Snow logo here. The image should have the following class=”img-fluid rounded mx-auto d-block py-1”. We want the image to be fluid. Themx-autoandd-blockcenter the image in the page.py-1gives a little padding on the y-axis. -
Create the second menu in a manner similar to the first. This time the menu item are in five columns in a “row justify-content-center pt-4”.
-
Use another “row justify-content-center” class to format the full-width photo of the model sitting on the bridge. Get this photo here.
-
Check to see that the middle of your page looks similar to the one in the screen image above.
-
Now commit your branch to GitHub, and check to see that it’s there.
-
Stop your timer and record your time. Be sure to record it, because you will need your WOD time data when you write your technical essay.
Rx: <9 min Av: 9-12 min Sd: 12-15 min DNF: 15+ min
If you need to repeat WOD 2, just revert to the main branch and start over with a new branch called “middle-2”.
Once you’ve finished doing WOD 2 a single time, watch me do it:
WOD 3: The footer
-
Start your timer.
-
Merge the final version of your “middle” branch back into main.
-
Create a branch of your islandsnow main branch called “footer-1”. Do your work in this branch.
- Add a “footer” to hold the contents.
- Style the
footer'sbackground-color to#292929and colorwhite. - Use a “container” to add padding to the left and right of your grid.
- Use a “row” to hold the three columns.
- Each column has a capitalized title, a “hr”, then the text.
- You can use an “input” type “text” and a “btn btn-dark” for the email input.
-
Check to see that your page looks like the screen image above.
-
Now commit your branch to GitHub, and check to see that it’s there.
-
Stop your timer and record your time. Be sure to record it, because you will need your WOD time data when you write your technical essay.
Rx: <13 min Av: 13-16 min Sd: 16-20 min DNF: 20+ min
If you need to repeat WOD 3, just revert to the main branch and start over with a new branch called “footer-2”.
Once you’ve finished doing WOD 3 a single time, watch me do it. Note that the footer design in the video is a little more complicated at the time this video was developed. The current footer is actually more simple to create:
Submission Instructions
By the time and date indicated in Laulima, submit this assignment via Laulima.
You must grant read access to this repo to the TA for your section. To do this:
- Retrieve your repository in a browser, then click on “Settings”. Depending upon the GitHub UI you are provided, you’ll then click on either “Collaborators” or “Manage Access”. Let us know if you can’t find either of these.
- For sections 001 and 002 search for “zerinnasrintumpa”, then click “Add collaborator”.
- For sections 003 search for “giorgio-tran”, then click “Add collaborator”.
- For sections 004 and 005 search for “acatarinaoaraujo”, then click “Add collaborator”.
Your submission should contain:
-
A link to the GitHub repository created as a result of your latest attempt at this practice WOD. Make sure you include the complete URL so that I can click on it in my mailer. Note: the final commit to this repo must have been made before the submission time and date, otherwise you will not receive credit for this assignment.
-
The number of times you have attempted this practice WOD so far, and for each time, how long it took you.
You will receive full credit for this practice WOD as long as you have attempted it at least once and submitted your work on Laulima with all required data before the due date. Your code does not have to run perfectly for you to receive full credit. However, if you do not repeat each practice WOD until you can finish it successfully in at least AV time, you are unlikely to do well on the in-class WOD. To reduce the stress associated with this course, I recommend that you repeat each practice WOD as many times as necessary to achieve at least AV before its due date.