E39: Meteor in 50 minutes
For this experience, you’ll watch the Meteor.js in 50 minutes screencast and create a GitHub repo that contains your copy of his simple system.
BTW, I estimate it will take you at least double the screencast time to recreate his system and think about what you’re doing, so give yourself a solid two hours to complete this experience.
Task 1: Initial setup
Do the following to set yourself up for development:
-
Create a GitHub repo called “meteor-50-minutes”.
-
Clone it to your local file space.
-
cd into your local meteor-50-minutes directory.
-
Use
meteor create meteor-50-minutesto create an app called “meteor-50-minutes” inside your repo. -
Change the name of the meteor-50-minutes subdirectory to app/.
-
cd into the app/ directory, run ‘meteor npm install’ and ‘meteor run’ to run the app. Go to http://localhost:3000 to see the app.
-
Create an IntelliJ project called “meteor-50-minutes” that points to your repo.
-
If IntelliJ tries to run ESLint and fails, click on “Settings” in the failure dialog and uncheck the “Enable” box to disable ESLint. (Don’t worry: We’ll configure ESLint next week.)
-
Edit the top-level template and check to see that Meteor restarts and refreshes the page automatically.
-
Commit your project to GitHub. Use the commit message: “Task 1: Initial setup”.
-
Check to see that your project is saved on GitHub. (Note that when grading this project, we’ll check that this initial commit was made, so don’t skip this step!)
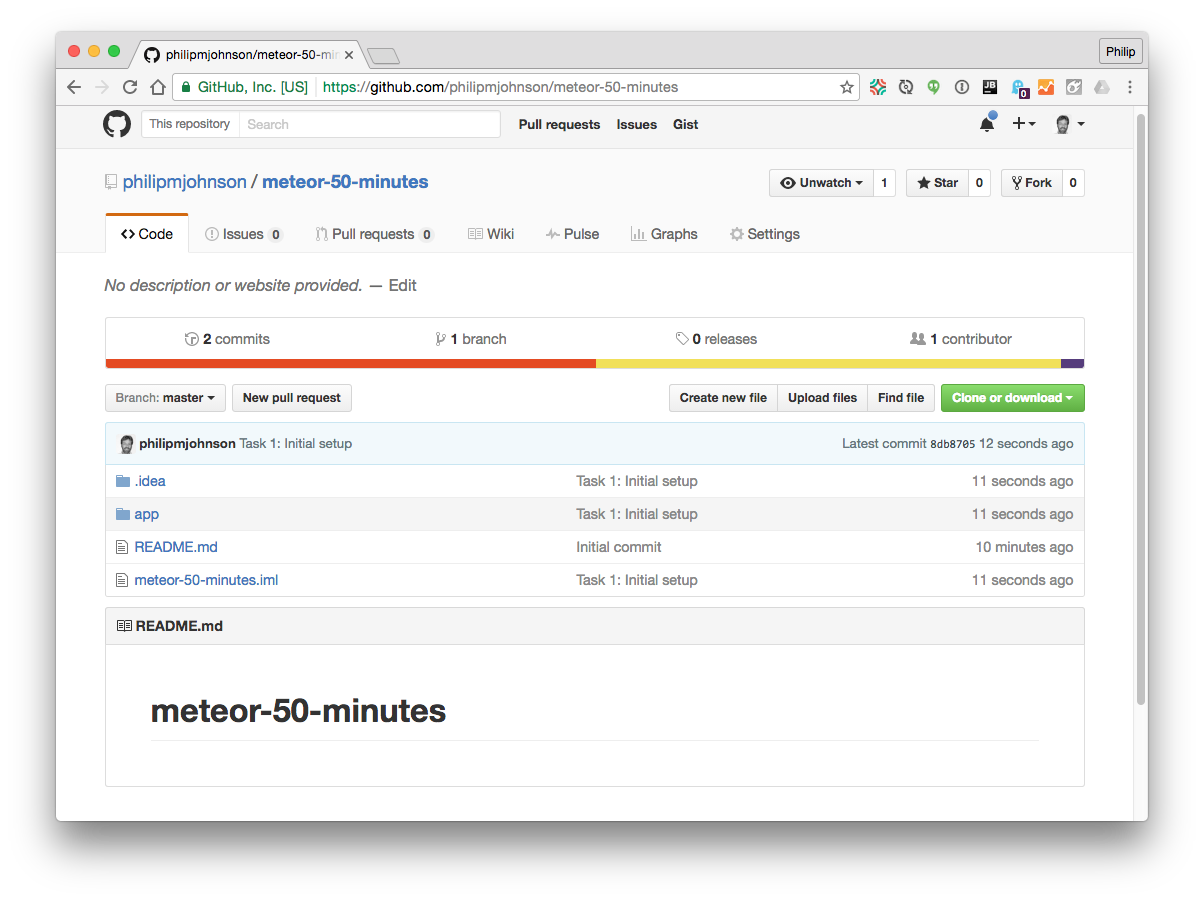
Here is what the top-level of your GitHub repo should look like at the conclusion of this step:
Task 2: Tasklist setup
Now start watching Meteor.js in 50 minutes. At about the 10 minute mark, you’ll notice that his file layout (from Meteor 1.1) is different from yours (Meteor 1.4), but that the application still does the exact same thing (increment a counter after pushing a button).
The difference is that the Meteor development team decided to create client/ and server/ directories for the default app in newer releases of Meteor, but the underlying code is the same. (For more details about this topic, the Meteor for Newbies: Application Structure Screencast).
Anyway, around 14:20 he deletes all of the code in the javascript file to start over. So, when you get to this point in the video:
-
Delete the client/ and server/ directories from app/.
-
Create empty tasklist.css, tasklist.html, and tasklist.js files at the top-level of the app/ directory.
-
Start recreating his code within your tasklist.js and tasklist.html files as shown in the video.
-
Continue watching the video and replicating everything he does in your own app until the 20 minute mark.
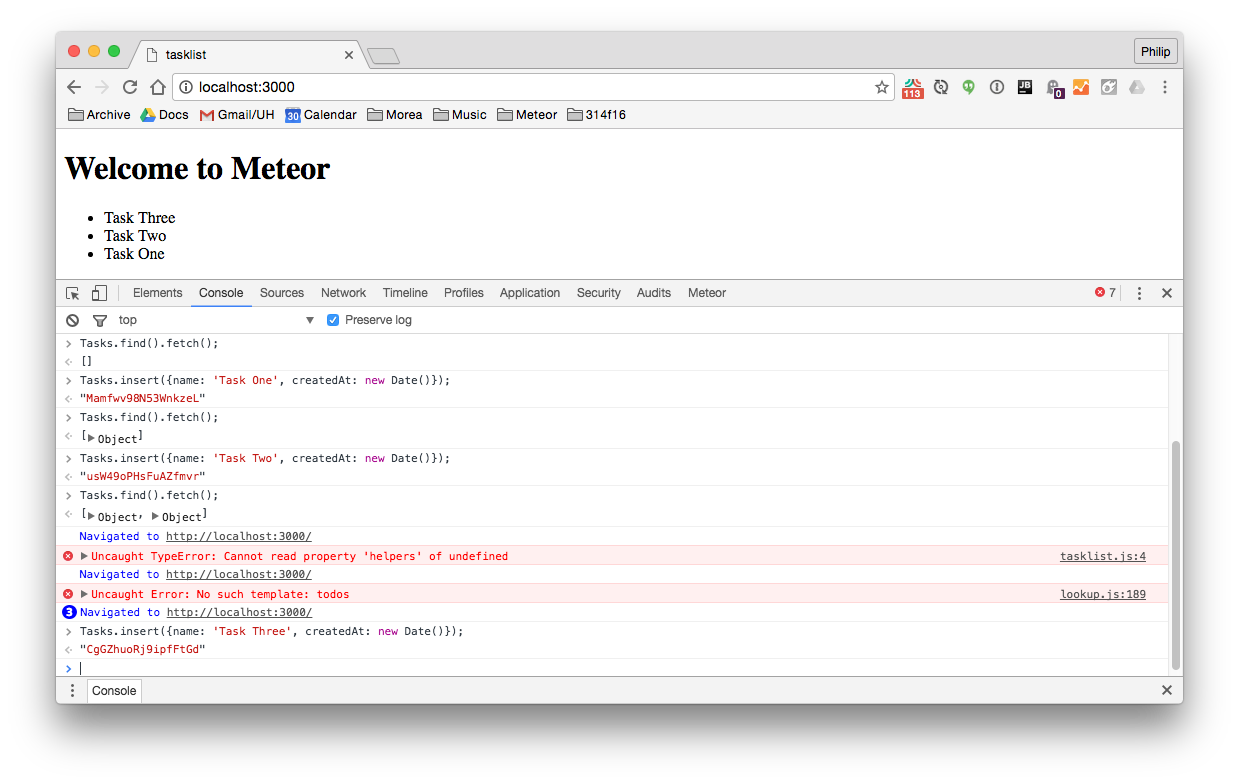
Here is a screenshot of what your running app (and the Chrome developer Tools window) should look like around the 20 minute mark of the video:
Your tasklist.js file should now look like this:
Tasks = new Mongo.Collection('tasks');

if (Meteor.isClient) {
  Template.tasks.helpers({
    tasks: function() {
      return Tasks.find({}, {sort: {createdAt: -1}});
    }
  });
}

if (Meteor.isServer) {

}
Your tasklist.html file should now look like this:
If you find Meteor does not display things correctly when your code looks like this, you can try doing a control-c in your Meteor console to kill the Meteor process, then reset and re-run Meteor with:
$ meteor reset
$ meteor run
Once you get this far, commit your code to GitHub. Use the commit message “Task 2: Tasklist setup”.
Task 3: Tasklist form
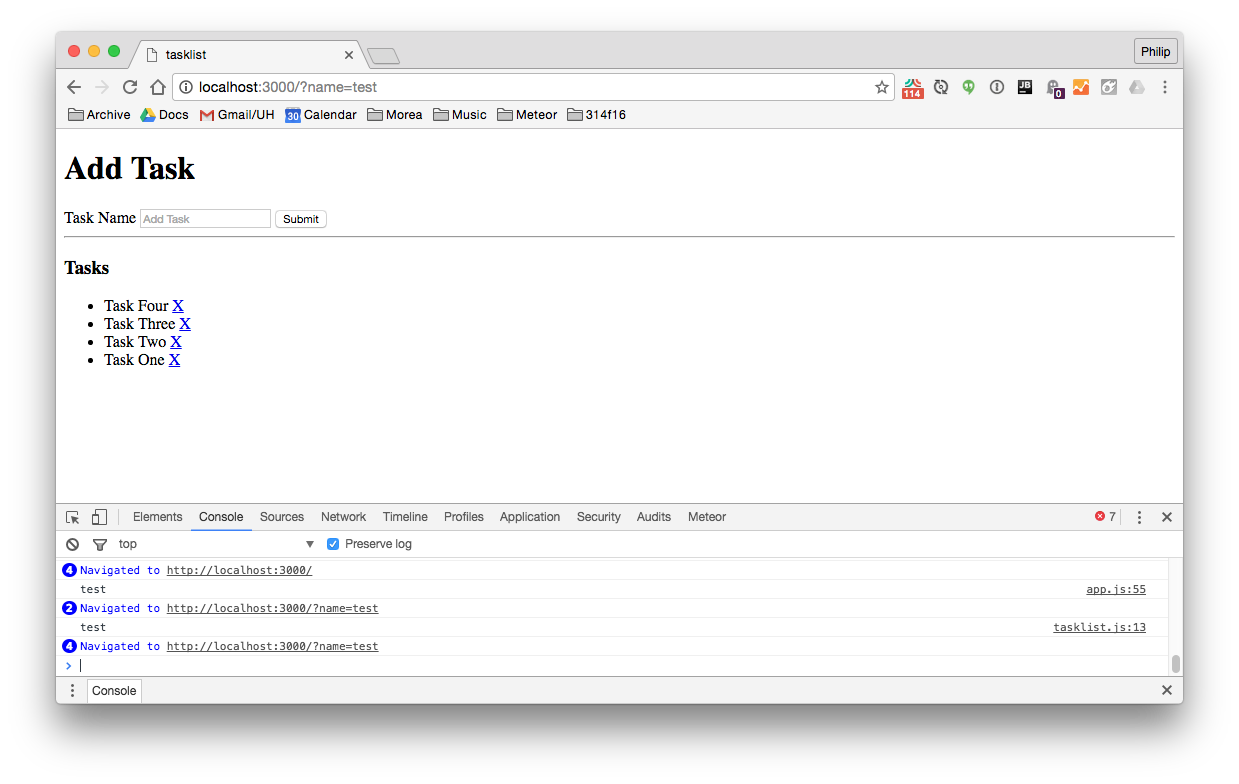
Watch and replicate the edits shown in the video from minute 20:00 to minute 28:20. During this time he will demonstrate how to add and delete task entries. When you are done, your screen should look like this:
Your tasklist.js file should now look like this:
Tasks = new Mongo.Collection('tasks');

if (Meteor.isClient) {
  Template.tasks.helpers({
    tasks: function() {
      return Tasks.find({}, {sort: {createdAt: -1}});
    }
  });

  Template.tasks.events({
    "submit .add-task": function(event) {
      let name = event.target.name.value;
      Tasks.insert({
        name: name, createdAt: new Date()
      });
      event.target.name.value = '';
      return false;
    },

    "click .delete-task": function(event) {
      if (confirm('Delete Task?')) {
        Tasks.remove(this._id);
      }
      return false;
    }
  })
}

if (Meteor.isServer) {

}
Your tasklist.html file should now look like this:
Resist the temptation to just copy and paste this code unless your own attempts to follow the video fail. You’ll learn more by going more slowly and thinking through why he writes the code that he writes. Here are some questions for you to ponder:
- He decides to move the form from the body into the tasks template. Why did he do that?
- To remove a task, he refers to it with
this._id. Why does that work?
Why you have completed this part, commit your changes to GitHub with the commit message “Task 3: Tasklist form”.
Task 4: Tasklist authentication
Continue to watch the video and replicate the improvements until minute 40:25. During this time, you will add a login button, remove the insecure package, and add Meteor methods to add and remove tasks.
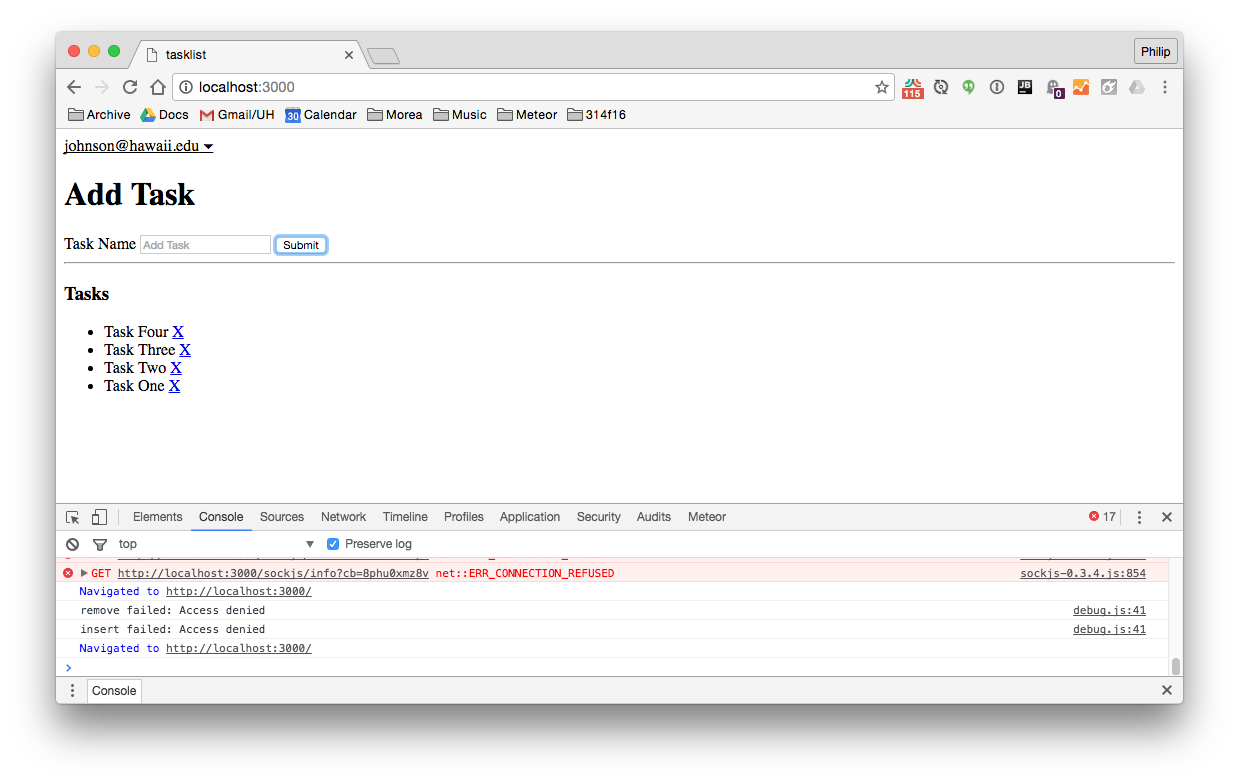
At the conclusion of this section your screen should look like this:
Your tasklist.js file should now look like this:
Tasks = new Mongo.Collection('tasks');

if (Meteor.isClient) {
  Template.tasks.helpers({
    tasks: function() {
      return Tasks.find({}, {sort: {createdAt: -1}});
    }
  });

  Template.tasks.events({
    "submit .add-task": function(event) {
      let name = event.target.name.value;
      Meteor.call('addTask', name);
      event.target.name.value = '';
      return false;
    },

    "click .delete-task": function(event) {
      if (confirm('Delete Task?')) {
        Meteor.call('deleteTask', this._id);
      }
      return false;
    }
  })
}

if (Meteor.isServer) {

}

Meteor.methods({
  addTask: function(name){
    if (!Meteor.userId()) {
      throw new Meteor.Error('No Access');
    }
    Tasks.insert({
      name: name, createdAt: new Date(), userId: Meteor.userId()
    });
  },

  deleteTask: function(taskId) {
    Tasks.remove(taskId);
  }
})
And your tasklist.html should now look like this:
To better understand the insecure package, now go into your Chrome Developer Console associated with your running Meteor application and try to insert a new task:
Tasks.insert({name: 'Task Six', createdAt: new Date()});
What two things happen? Why do those two things happen?
Now commit your code to GitHub, with the commit message “Task 4: Tasklist authentication”.
Task 5: Subscriptions
Now watch the video until the end. In this final 8 eight minutes, you will remove the autopublish package, then add publish and subscribe calls so that each user gets access to only their tasks.
At the conclusion of this section your screen should look like this:
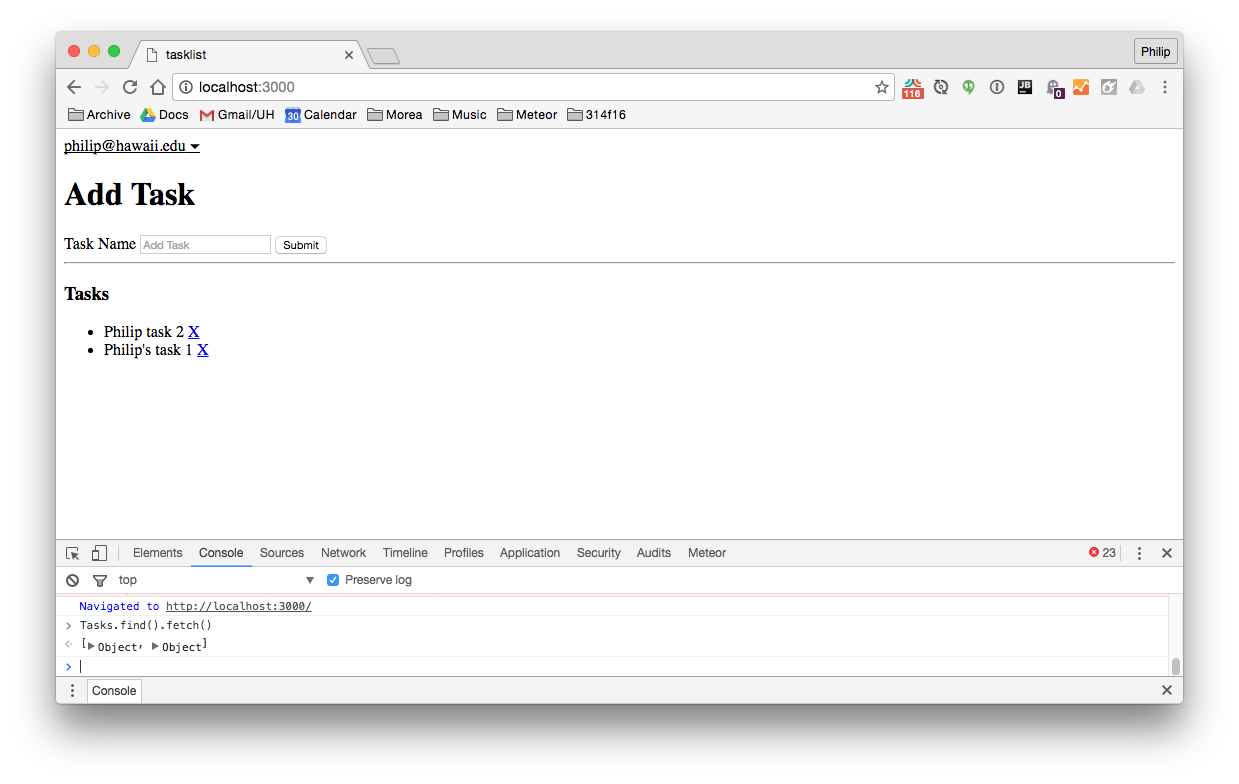
Your tasklist.js file should now look like this:
Tasks = new Mongo.Collection('tasks');

if (Meteor.isClient) {
  Meteor.subscribe('tasks');

  Template.tasks.helpers({
    tasks: function() {
      return Tasks.find({}, {sort: {createdAt: -1}});
    }
  });

  Template.tasks.events({
    "submit .add-task": function(event) {
      let name = event.target.name.value;
      Meteor.call('addTask', name);
      event.target.name.value = '';
      return false;
    },

    "click .delete-task": function(event) {
      if (confirm('Delete Task?')) {
        Meteor.call('deleteTask', this._id);
      }
      return false;
    }
  })
}

if (Meteor.isServer) {
  Meteor.publish('tasks', function() {
    return Tasks.find({userId: this.userId});
  })
}

Meteor.methods({
  addTask: function(name){
    if (!Meteor.userId()) {
      throw new Meteor.Error('No Access');
    }
    Tasks.insert({
      name: name, createdAt: new Date(), userId: Meteor.userId()
    });
  },

  deleteTask: function(taskId) {
    Tasks.remove(taskId);
  }
})
Your tasklist.html file is unchanged from the prior section.
Make your last commit of your code to GitHub with the commit message “Task 5: subscriptions”.
Submission instructions
By the time and date indicated on the Schedule page, submit this assignment via Laulima. You should submit the complete URL to the GitHub repo containing your code for this assignment. There should be five commits and each commit should contain a running version of the system as specified above.