How to deploy a Meteor application to Digital Ocean
Digital Ocean is a popular cloud-based hosting service. Here is a step-by-step guide to deploying Meteor Application Template React to Digital Ocean.
Digital Ocean setup
The first few steps involve setting up your server at Digital Ocean.
1. Sign up with Digital Ocean
First, go to Digital Ocean and click on the Free Credit Active: Get started on DigitalOcean with a $100, 60-day credit for new users button to create an account.
You will be asked for a credit card number in order to verify your identity, but you will receive $100 credit for signing up, so you will incur no cost for using Digital Ocean in this class.
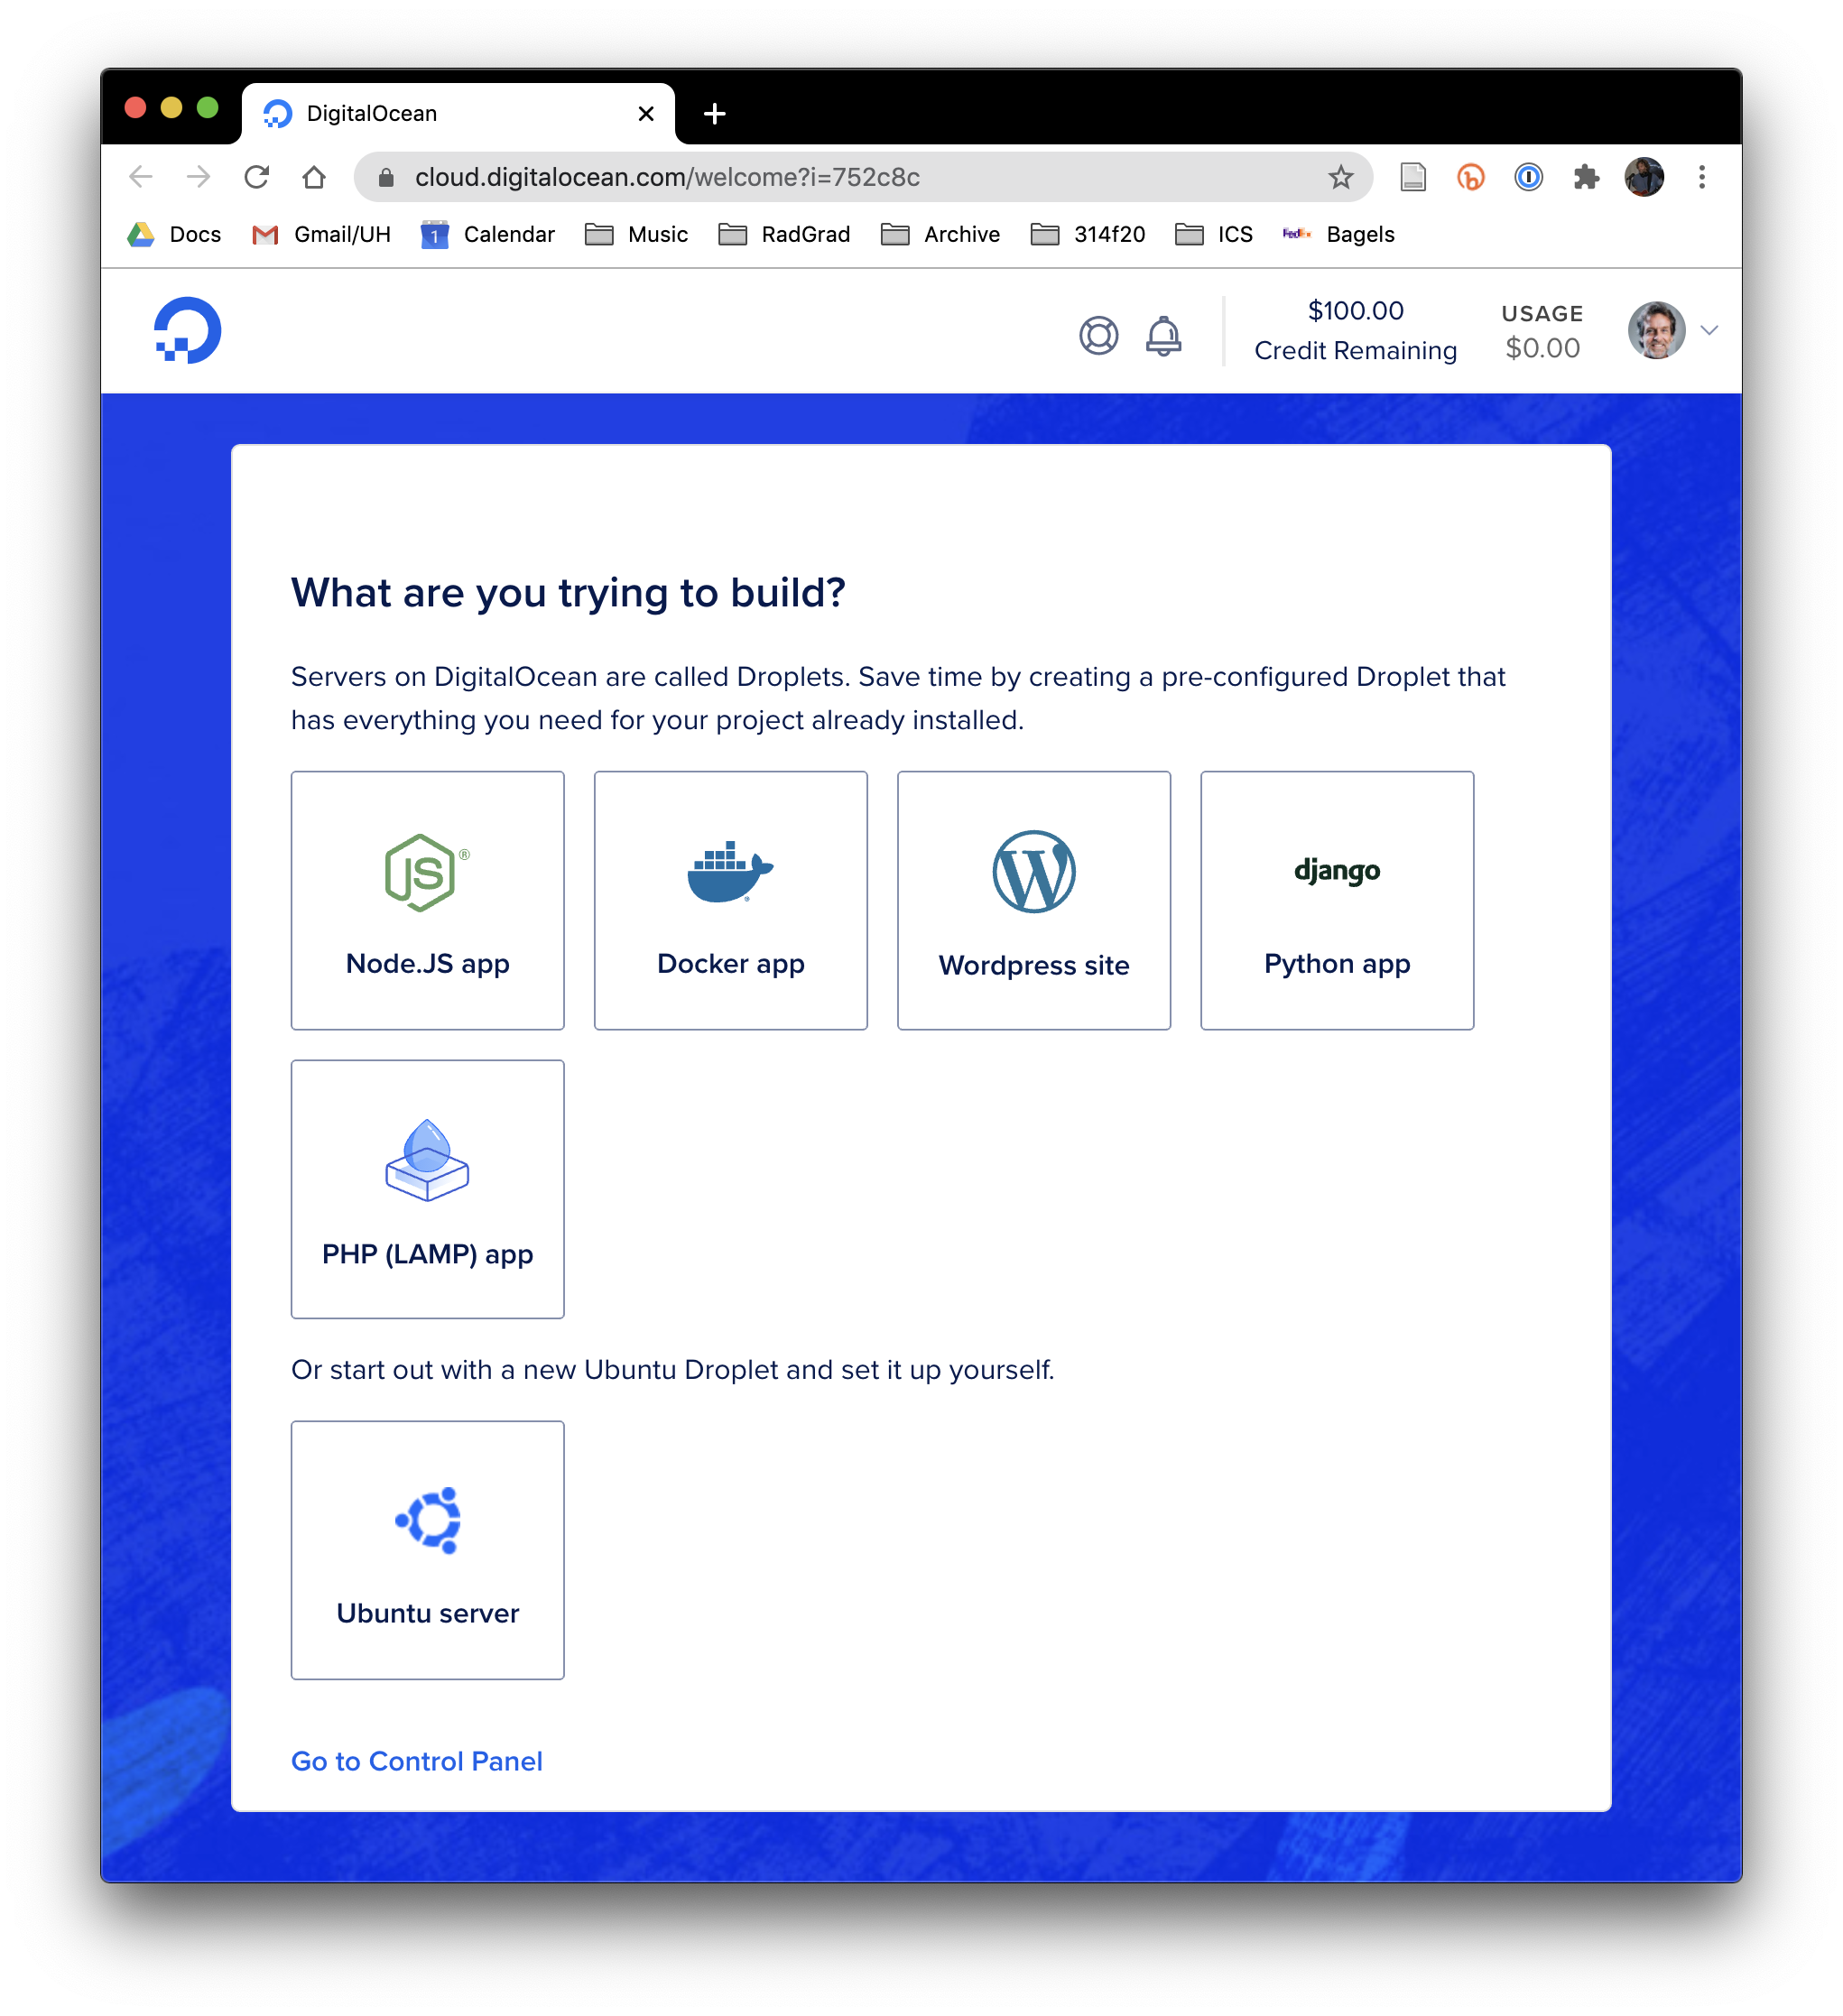
After signing in, you will see a screen like this that lists the kinds of services you can create.
2. Create an Ubuntu server (i.e. “droplet”)
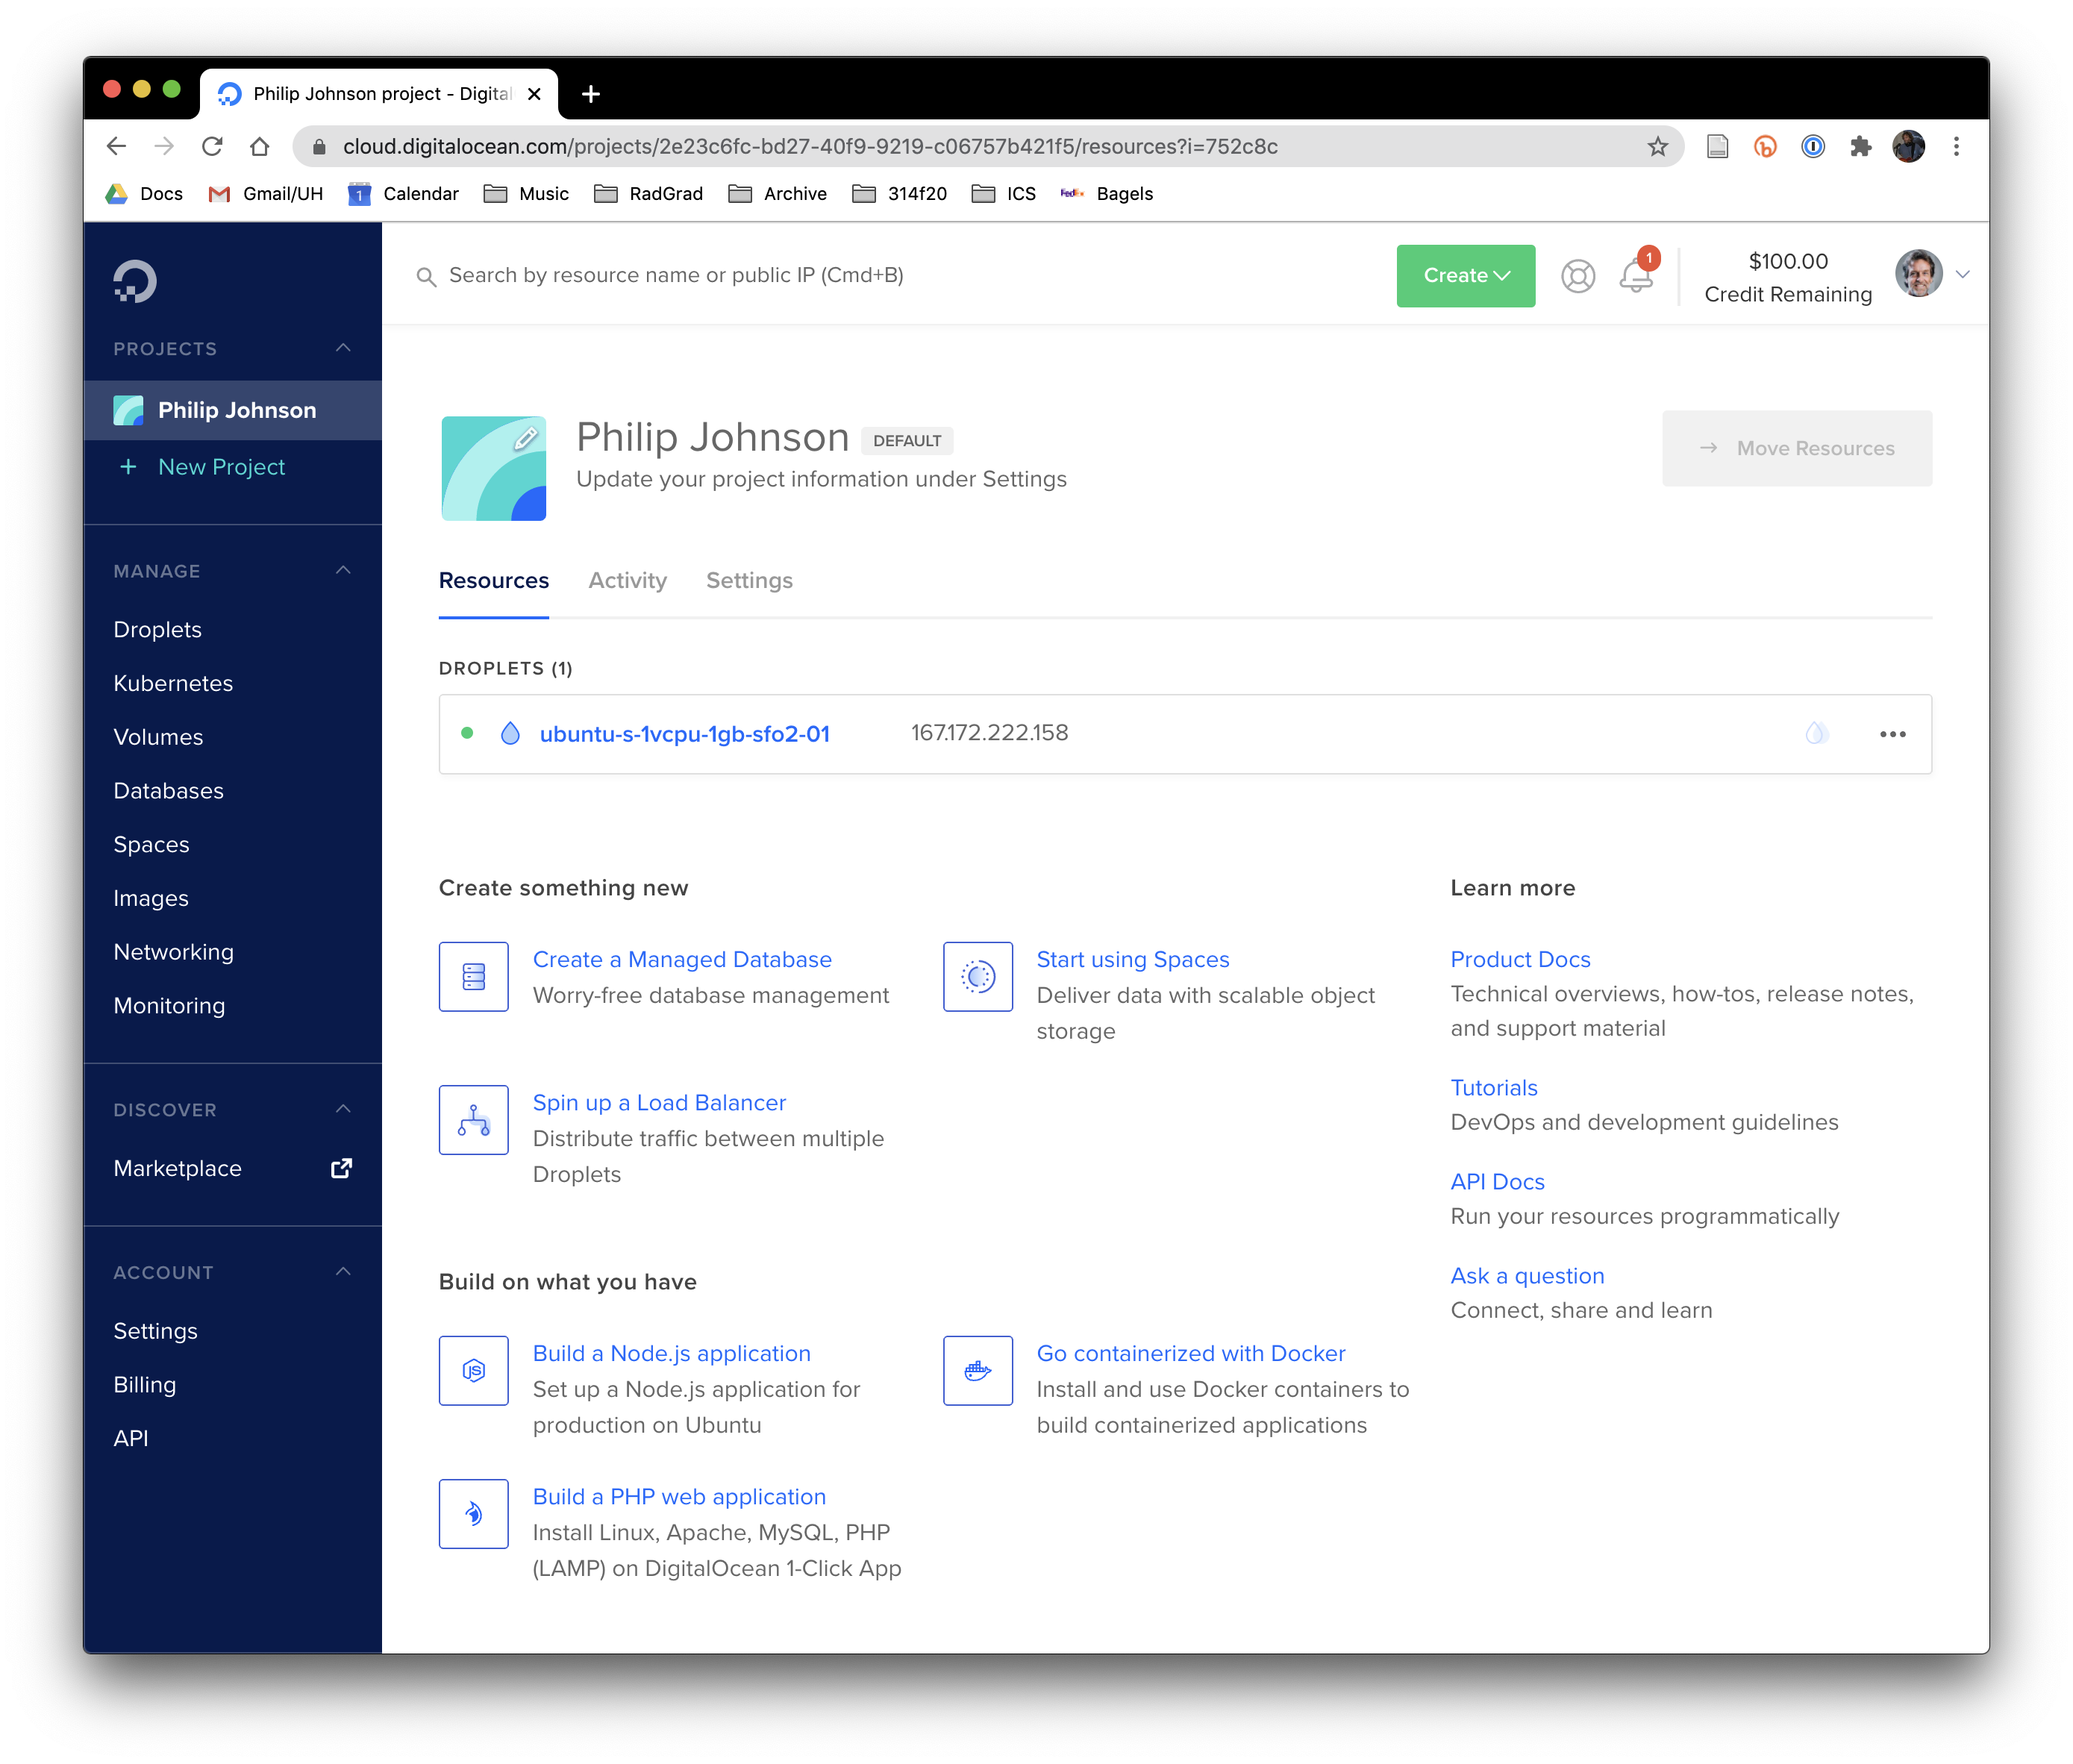
You want to create an Ubuntu server. After clicking on that button, Digital Ocean will provision an Ubuntu server and modify your control panel to show it:
You should also receive an email with the subject line beginning “Your New Droplet”. This email message will contain a long string containing the temporary password for the root user.
If you do not receive an email within a couple of minutes, click on the “Access” tab and then click on “Reset root password” (see next screenshot). This will send a new email with a new temporary root password.
3. Set the root password for your droplet
Next, you’ll need to set a root password for your server. Click on the droplet name (in the screenshot above, it’s “ubuntu-s-1vcpu-1gb-sfo2-01”) to go to a page with details about that droplet. Click on “Access” to go to a page with a button to “Launch console”:
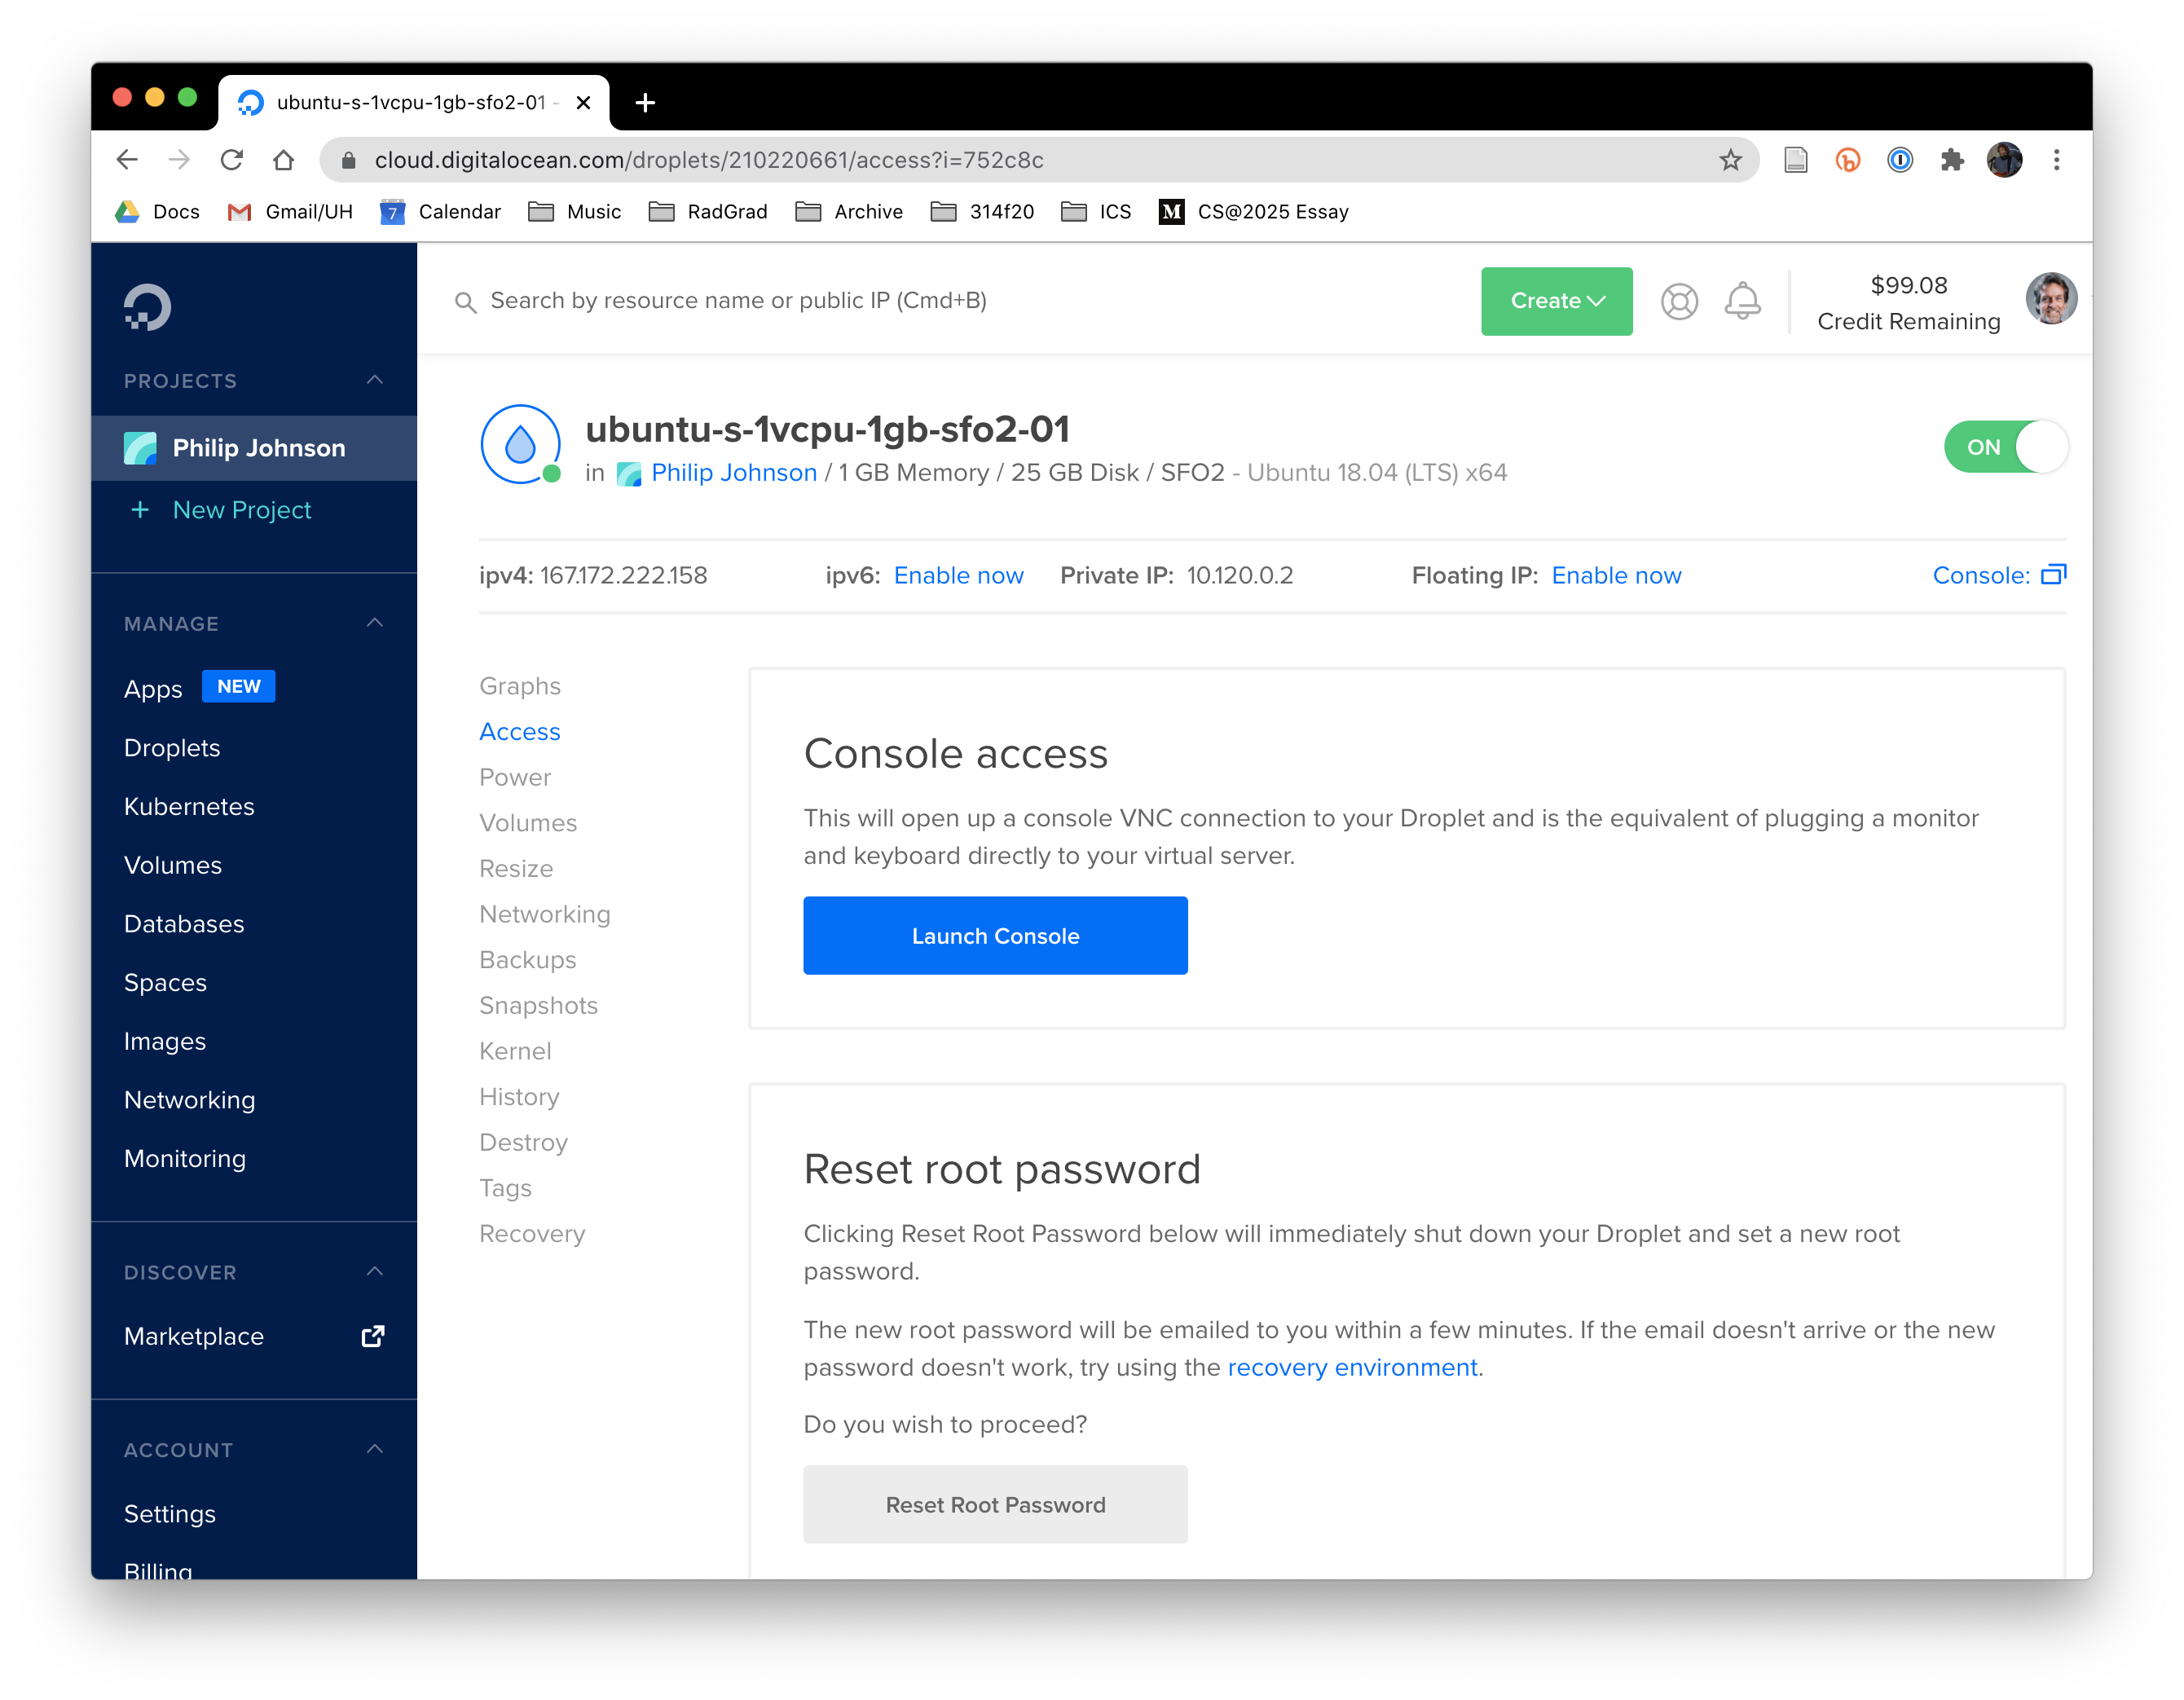
Click the Launch Console button to create a new window requesting a username and password. Type in “root” for the username, and cut and paste the temporary root password that you received in your email.
Upon logging in, the server will immediately require you to change this password. First, you’ll have to re-enter the temporary password (the one in your email). After entering that one successfully, you’ll be able to type in a new password (and then type it in again to confirm).
This new password that you’ve just specified will now be the root password used for deployment.
You can now close this console.
Local setup
The remainder of this sample deployment will be done on your laptop.
4. Clone a copy of meteor-application-template-react
Go to the github repo for meteor-application-template-react, and click on “Use this template” to create a copy of this repo in your personal GitHub account, then clone it to your laptop.
Next, run “meteor npm install” and “meteor npm run start” to verify that the application runs correctly in your local environment.
5. Install Meteor Up
Following the directions to install Meteor Up, install Meteor Up onto your laptop by running:
$ npm install --global mup
6. Create app/.deploy/mup.js and app/.deploy/settings.json
Create an IntelliJ Project for your local copy of meteor-application-template-react so you can edit files.
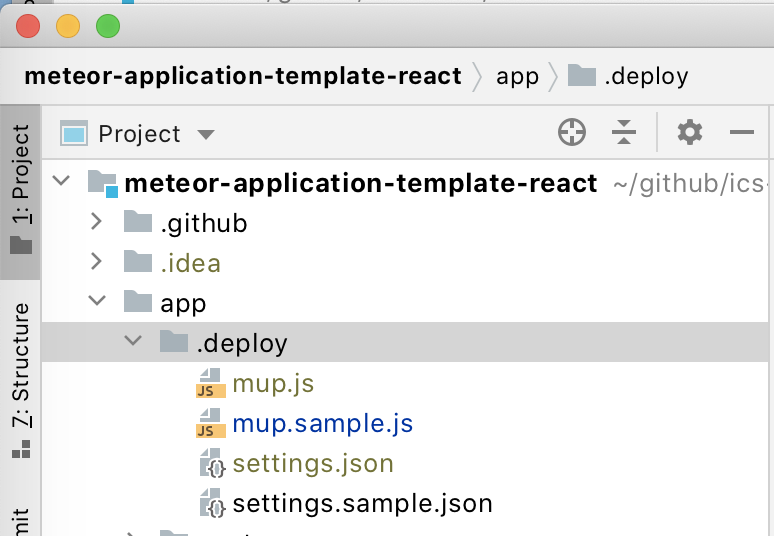
In the app/.deploy directory, you’ll find two files: mup.sample.js and settings.sample.json. Make a copy of mup.sample.js called mup.js, and a copy of settings.sample.json called settings.json. When you’re done, the .deploy directory should look like this:
The files mup.js and settings.json are git-ignored, so you can store credentials in these files without fear of them being accidentially uploaded to GitHub.
7. Configure mup.js
To do the initial deployment, you only need to edit mup.js. It starts out looking like this:
module.exports = {
  servers: {
    one: {
      host: '111.222.333.444',
      username: 'root',
      password: 'changeme'
    }
  },

  app: {
    name: 'meteor-application-template-react',
    path: '../',

    servers: {
      one: {},
    },

    buildOptions: {
      serverOnly: true,
    },

    env: {
      ROOT_URL: 'http://111.222.333.444',
      MONGO_URL: 'mongodb://mongodb/meteor',
      MONGO_OPLOG_URL: 'mongodb://mongodb/local',
    },

    docker: {
      image: 'abernix/meteord:node-12-base',
    },

    enableUploadProgressBar: true
  },

  mongo: {
    version: '3.4.1',
    servers: {
      one: {}
    }
  },
};
There is one occurrence of the string “changeme”, and two occurrences of the string “111.222.333.444”.
Change the string “changeme” (i.e. the server root password) to the Droplet root password you specified above.
Change the string “111.222.333.444” to the IP address associated with this Droplet. (In the screenshots above, the Droplet’s IP address is 167.172.222.158.) Be sure to use the “ipv4” address, not the “Private IP” address!
Note that the “host” value is just the IP address, but the ROOT_URL is “http://” followed by the IP address.
8. Run mup setup
The next step is to setup your Droplet to run your Meteor application and MongoDB database.
Inside the app/.deploy directory, invoke “mup setup” (or “mup.cmd setup” on Windows). You should get output like the following:
$ mup setup

Started TaskList: Setup Docker
[167.172.222.158] - Setup Docker
[167.172.222.158] - Setup Docker: SUCCESS

Started TaskList: Setup Meteor
[167.172.222.158] - Setup Environment
[167.172.222.158] - Setup Environment: SUCCESS

Started TaskList: Setup Mongo
[167.172.222.158] - Setup Environment
[167.172.222.158] - Setup Environment: SUCCESS
[167.172.222.158] - Copying Mongo Config
[167.172.222.158] - Copying Mongo Config: SUCCESS

Started TaskList: Start Mongo
[167.172.222.158] - Start Mongo
[167.172.222.158] - Start Mongo: SUCCESS

Next, you should run:
    mup deploy

$
For more details on the setup command, see http://meteor-up.com/docs.html#setting-up-a-server.
9. Run mup deploy
Now you can bundle up your Meteor application, send it over to the Droplet, and start it running on your Droplet.
Inside the app/.deploy directory, invoke “mup deploy” (or, on Windows “mup.cmd deploy”). You should get output like the following:
$ mup deploy
Building App Bundle Locally

Started TaskList: Pushing Meteor App
[167.172.222.158] - Pushing Meteor App Bundle to the Server
[167.172.222.158] - Pushing Meteor App Bundle to the Server: SUCCESS
[167.172.222.158] - Prepare Bundle
[167.172.222.158] - Prepare Bundle: SUCCESS

Started TaskList: Configuring App
[167.172.222.158] - Pushing the Startup Script
[167.172.222.158] - Pushing the Startup Script: SUCCESS
[167.172.222.158] - Sending Environment Variables
[167.172.222.158] - Sending Environment Variables: SUCCESS

Started TaskList: Start Meteor
[167.172.222.158] - Start Meteor
[167.172.222.158] - Start Meteor: SUCCESS
[167.172.222.158] - Verifying Deployment
[167.172.222.158] - Verifying Deployment: SUCCESS

$
For more details on the deploy command, see http://meteor-up.com/docs.html#deploying-an-app.
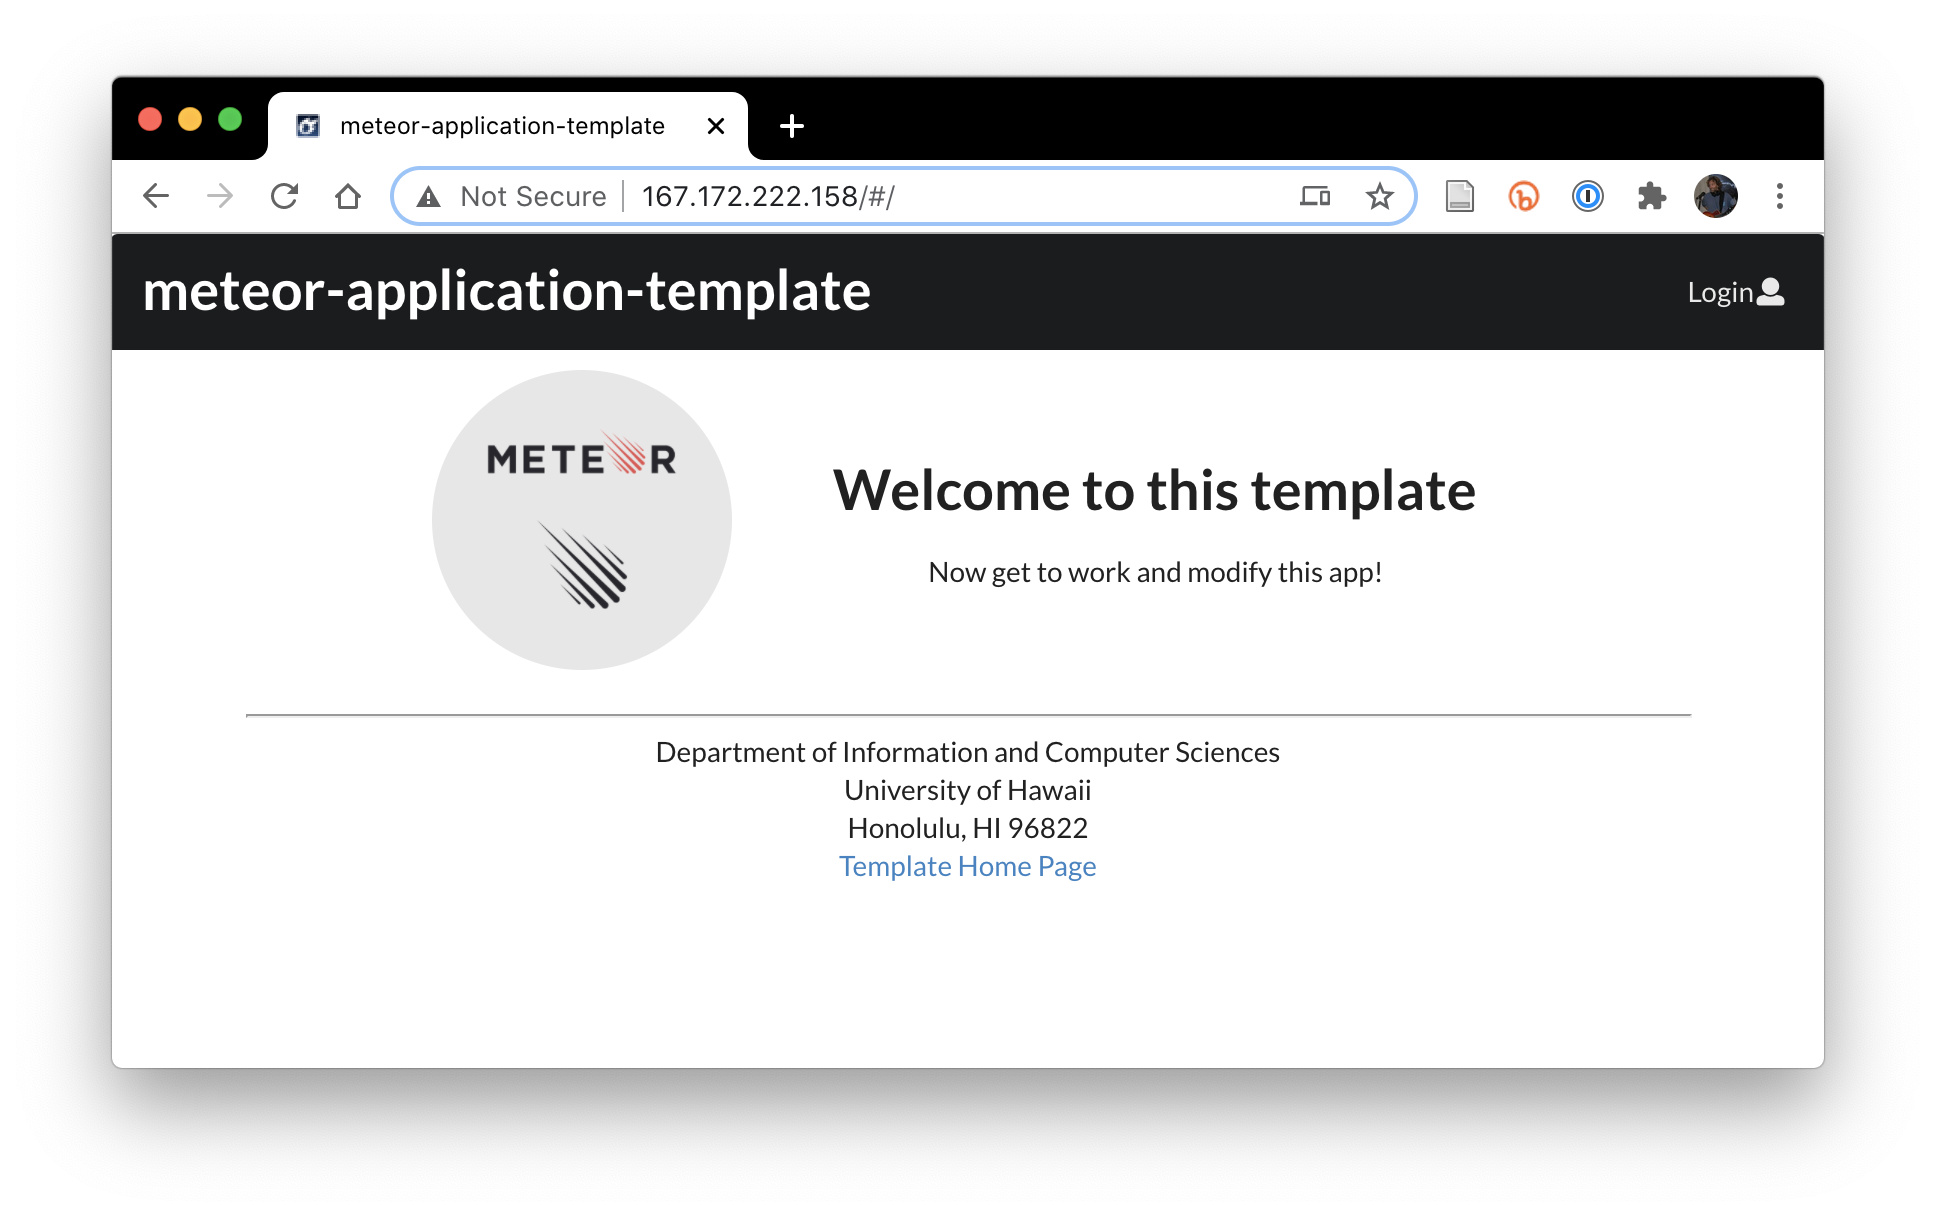
10. View your deployed application
The meteor-application-template-react application will now be available at http://111.222.333.444, where “111.222.333.444” is replaced by the IP address for your Droplet.
For example:
Caution: avoid two simultaneous deployments!
It is unfortunately easy to deploy your app twice if you change the “name” field in mup.js. Let’s say your mup.js file looks like this:
 :
  app: {
     name: 'meteor-application-template-react',
 :
And then you run mup deploy to deploy your application. Now you decide to change the name of your application to, say, ‘grub-n-go’:
  :
   app: {
      name: 'grub-n-go',
  :
And you run mup deploy again. Unfortunately, this will result in two versions of your application running at the same time, one called “meteor-application-template-react” and one called “grub-n-go”. You can see this by running mup logs:
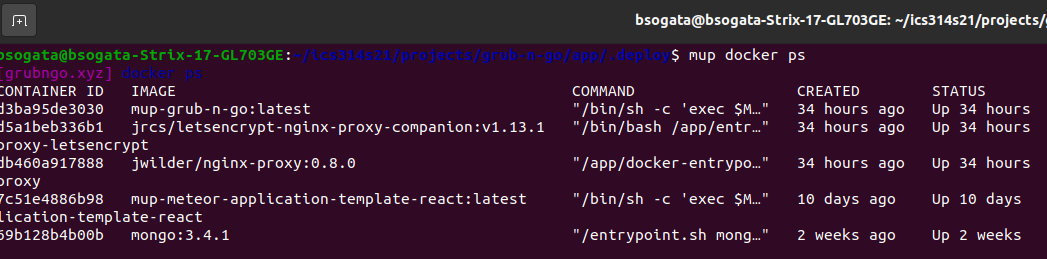
Having two deployments running simultaneously will create really strange, difficult to understand behavior when you visit the site, because sometimes the first version of your application will serve the page, and sometimes the second version will serve the page.
To avoid this situation entirely, make sure that if you change the name of your application in mup.js, you run mup stop first. That way, mup will terminate the process running under the original name, so that when you run mup deploy after editing mup.js, there will only be one deployed application.
If you are in the situation where there are two deployments running simultaneously, it’s easy to fix. First, edit mup.js to restore the original name, then run mup stop to stop that process. Finally, edit mup.js back to the new name and run mup deploy again, then run mup logs to ensure that everything is OK.