E42: Experience Meteor Mongo
Now that you have some basic comfort with creating collections and documents in Mongo, it’s time to take a closer look at how Mongo is integrated with Meteor.
Preview
This is not a practice WOD because I could not find any Readings to introduce this material.
Task 1: Initial setup
Do the following to set yourself up for development:
-
Create a GitHub repo called “meteor-mongo-practice”.
-
Clone it to your local file space.
-
cd into your local meteor-mongo-practice directory.
-
Use
meteor create meteor-mongo-practiceto create an app called “meteor-mongo-practice” inside your repo. -
Change the name of the meteor-mongo-practice subdirectory to app/.
-
cd into the app/ directory, and invoke
meteor runto run the app. Go to http://localhost:3000 to verify that the default Meteor app is running. -
Create an IntelliJ project called “meteor-mongo-practice” that points to your repo.
-
If IntelliJ tries to run ESLint and fails, click on “Settings” in the failure dialog and uncheck the “Enable” box to disable ESLint. (Don’t worry: We’ll configure ESLint next week.)
Task 2: Install Meteor Dev Tools Evolved
There is a Chrome Developer Tools extension called “Meteor Dev Tools Evolved” that (among other things) makes it much easier to inspect the contents of the local Mini-Mongo database that runs in your Meteor clients.
Go to the Meteor Dev Tools Evolved Installation Page to install it.
Task 3: Create the People collection and a sample document.
For this step, we will recreate the People collection and sample documents from the last experience. However, this time we will do it using Meteor rather than via the MongoDB shell.
Create the PeopleCollection.js file
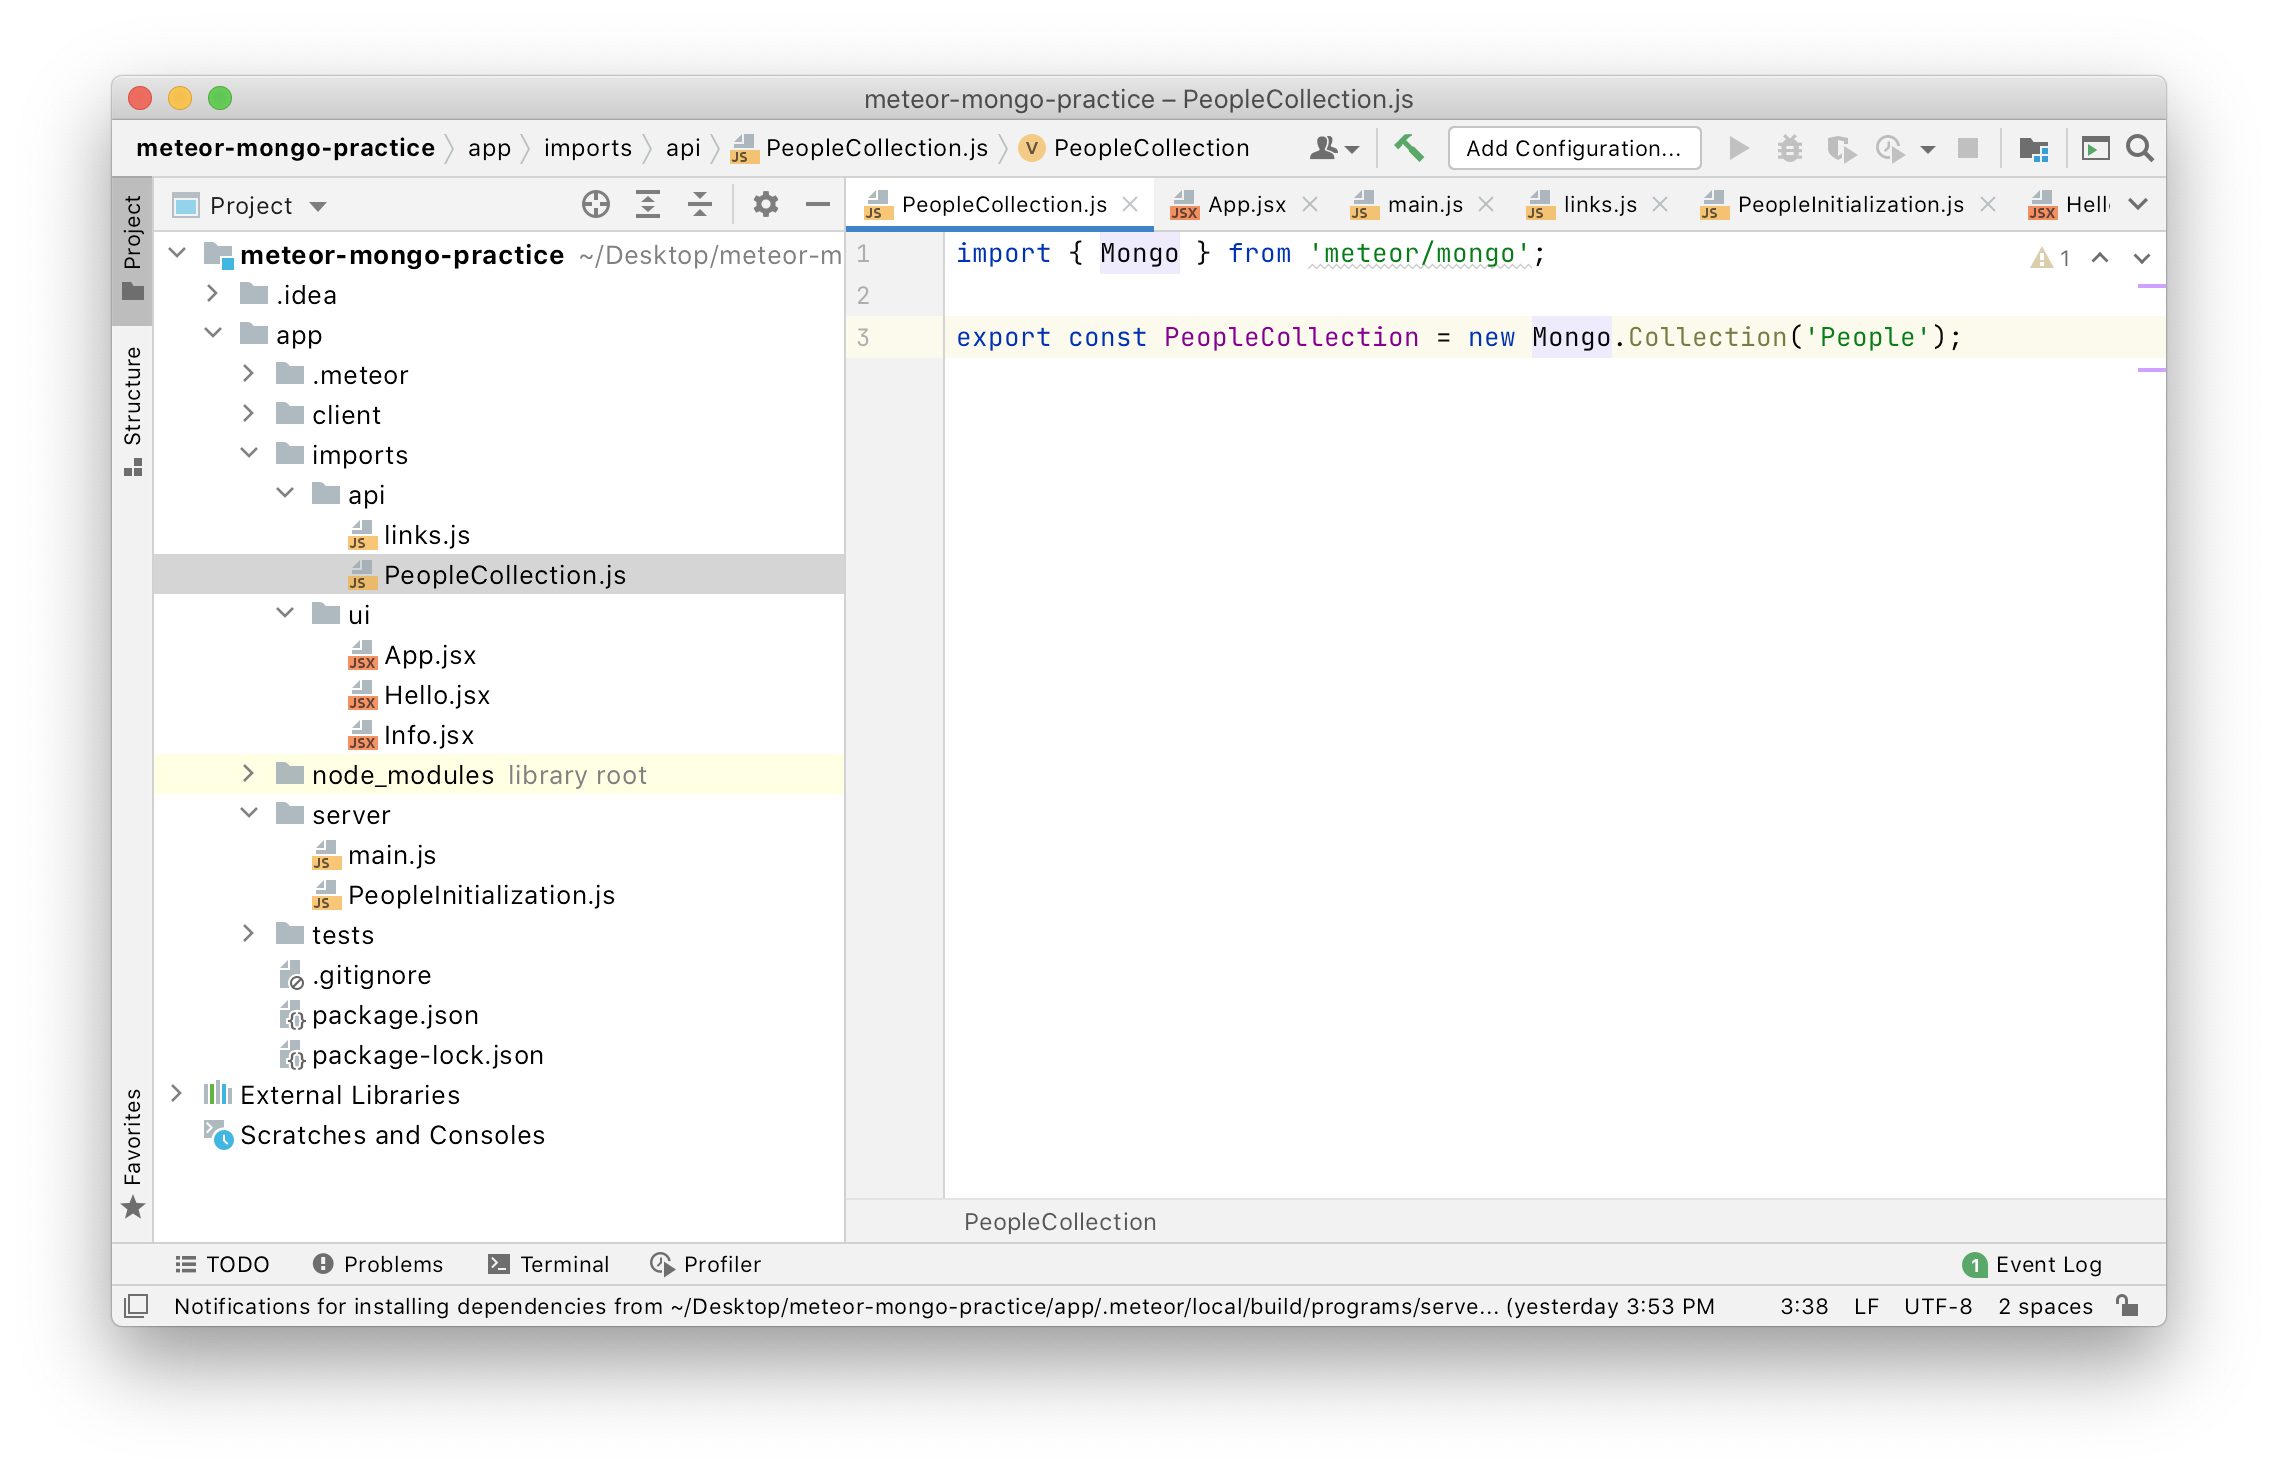
Inside the app/imports/api directory, create a file called PeopleCollection.js. Inside this file, put the following code:
import { Mongo } from 'meteor/mongo';

export const PeopleCollection = new Mongo.Collection('People');
The import statement says to make the predefined “Mongo” class available to code inside this file.
The export statement creates a new Mongo collection called “People” and bind it to the variable “PeopleCollection”. Finally, the statement exports the PeopleCollection variable, which means other files can access the PeopleCollection variable and its value by importing it.
For more details on the Mongo.Collection function, see the Mongo.Collection documentation.
When you’re done, the PeopleCollection.js file should look like this in IntelliJ:
Create the PeopleInitialization.js file
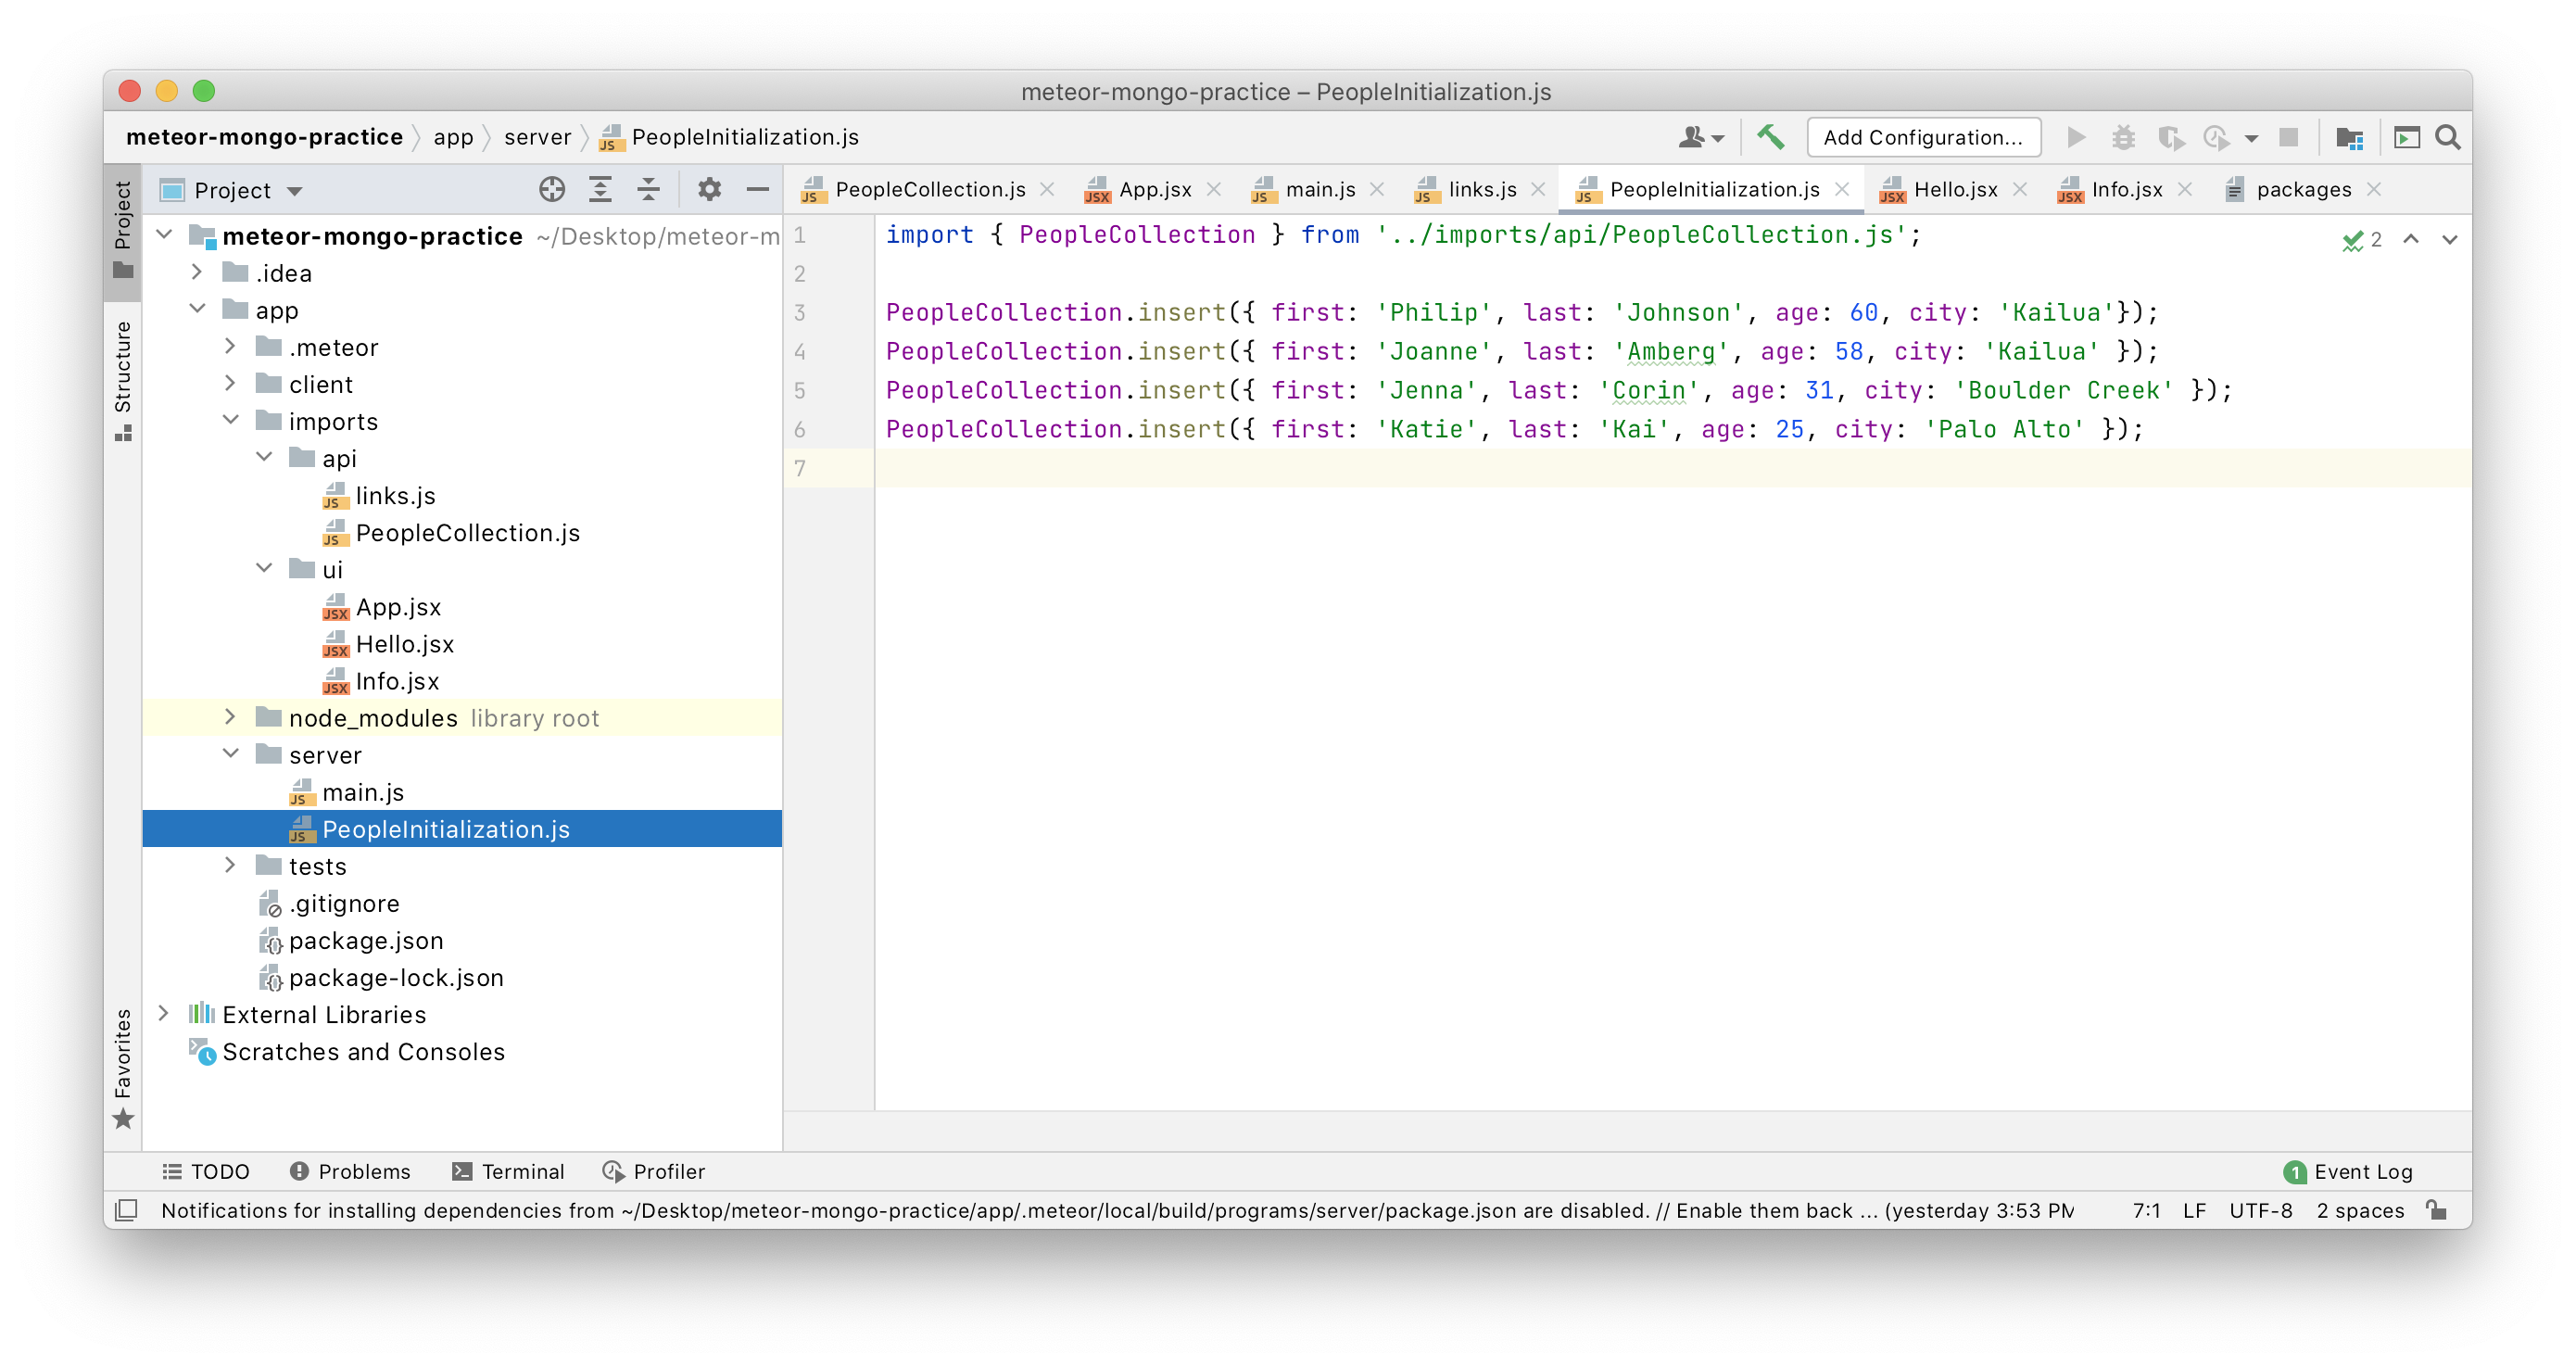
Inside the app/server/ directory, create a file called PeopleInitialization.js. Inside this file, put the following code:
import { PeopleCollection } from '../imports/api/PeopleCollection.js';

PeopleCollection.insert({ first: 'Philip', last: 'Johnson', age: 60, city: 'Kailua'});
PeopleCollection.insert({ first: 'Joanne', last: 'Amberg', age: 58, city: 'Kailua' });
PeopleCollection.insert({ first: 'Jenna', last: 'Corin', age: 31, city: 'Boulder Creek' });
PeopleCollection.insert({ first: 'Katie', last: 'Kai', age: 25, city: 'Palo Alto' });
The import statement says to load the PeopleCollection.js file (if it hasn’t already been loaded), and make the “PeopleCollection” variable defined within that file available for use in this file.
The following lines insert four documents into the MongoDB “People” collection.
For more details on the insert function, see the Mongo.Collection insert documentation.
When you’re done, the PeopleInitialization.js file should look like this in IntelliJ:
Import the PeopleInitialization in the server
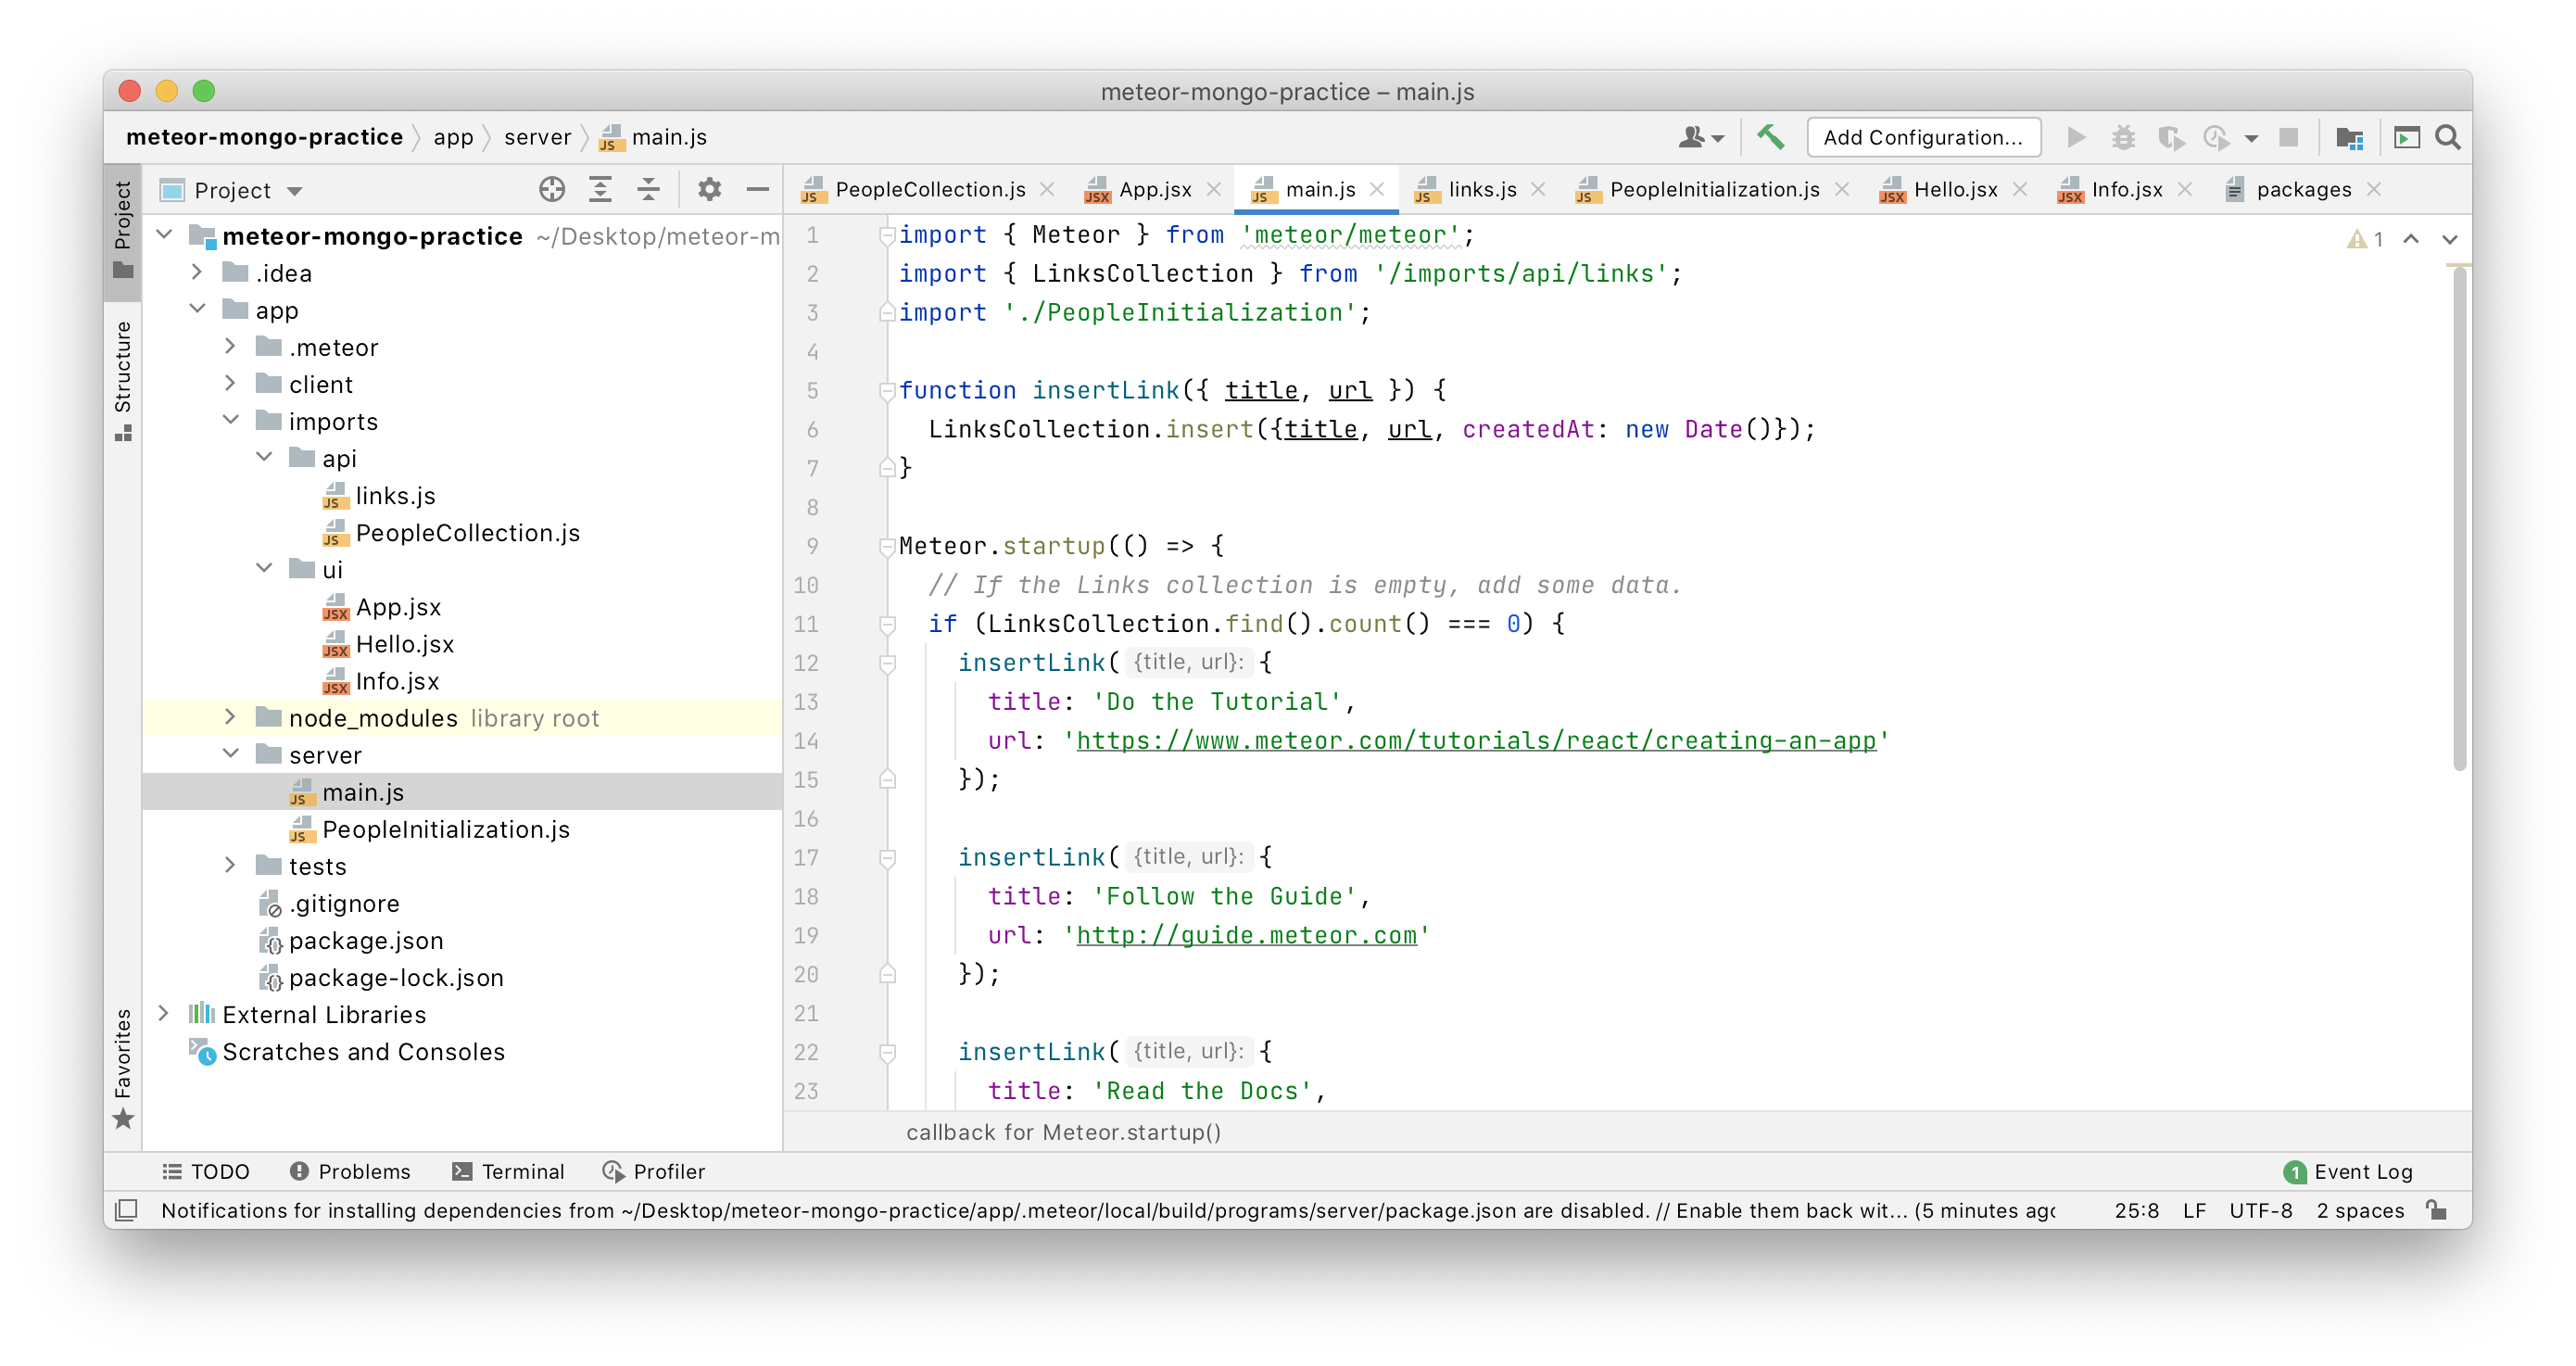
Edit server/main.js to include the line:
import './PeopleInitialization';
This ensures the PeopleCollection is initialized at startup.
When you’re done, the main.js file should look like this:
Update the Info component to retrieve the PeopleCollection collection
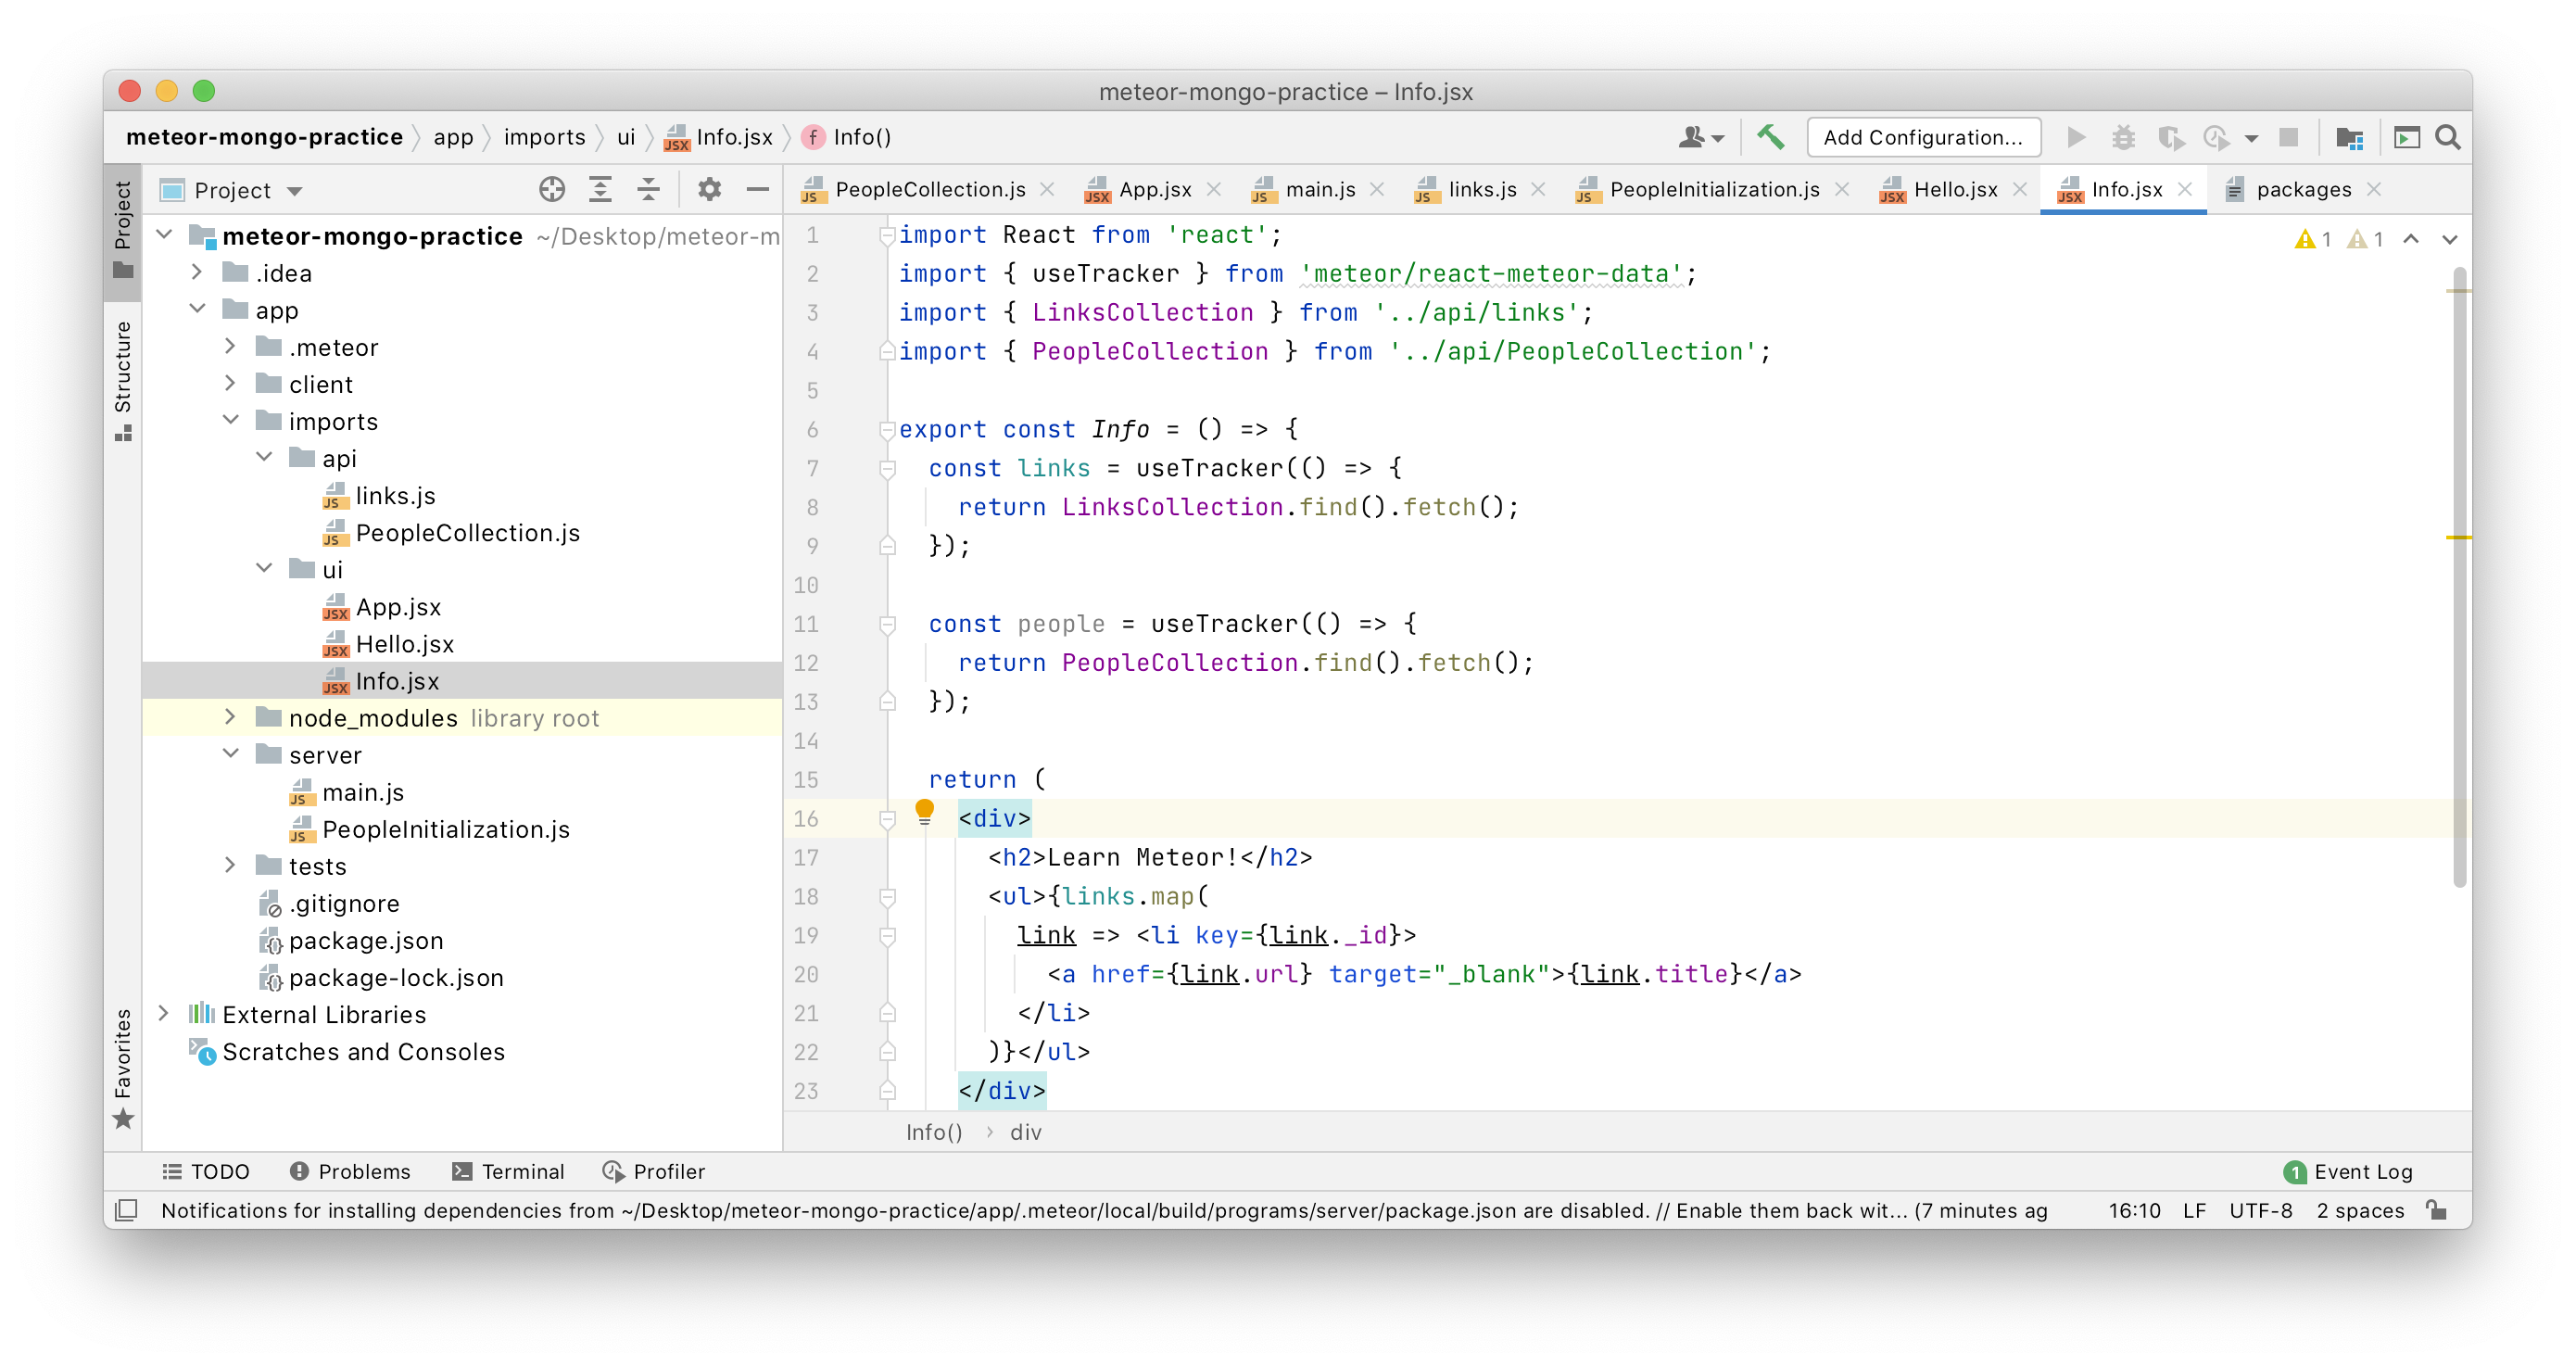
In app/imports/ui/Info.jsx, import the PeopleCollection by adding this line:
import { PeopleCollection } from '../api/PeopleCollection';
Then request this data using a call to useTracker (we will explain this later):
const people = useTracker(() => {
    return PeopleCollection.find().fetch();
});
Now the Info.jsx file should look like this:
Inspect the server-side and client-side databases
Once you’ve defined these files, let’s look at the server-side and client-side MongoDB databases.
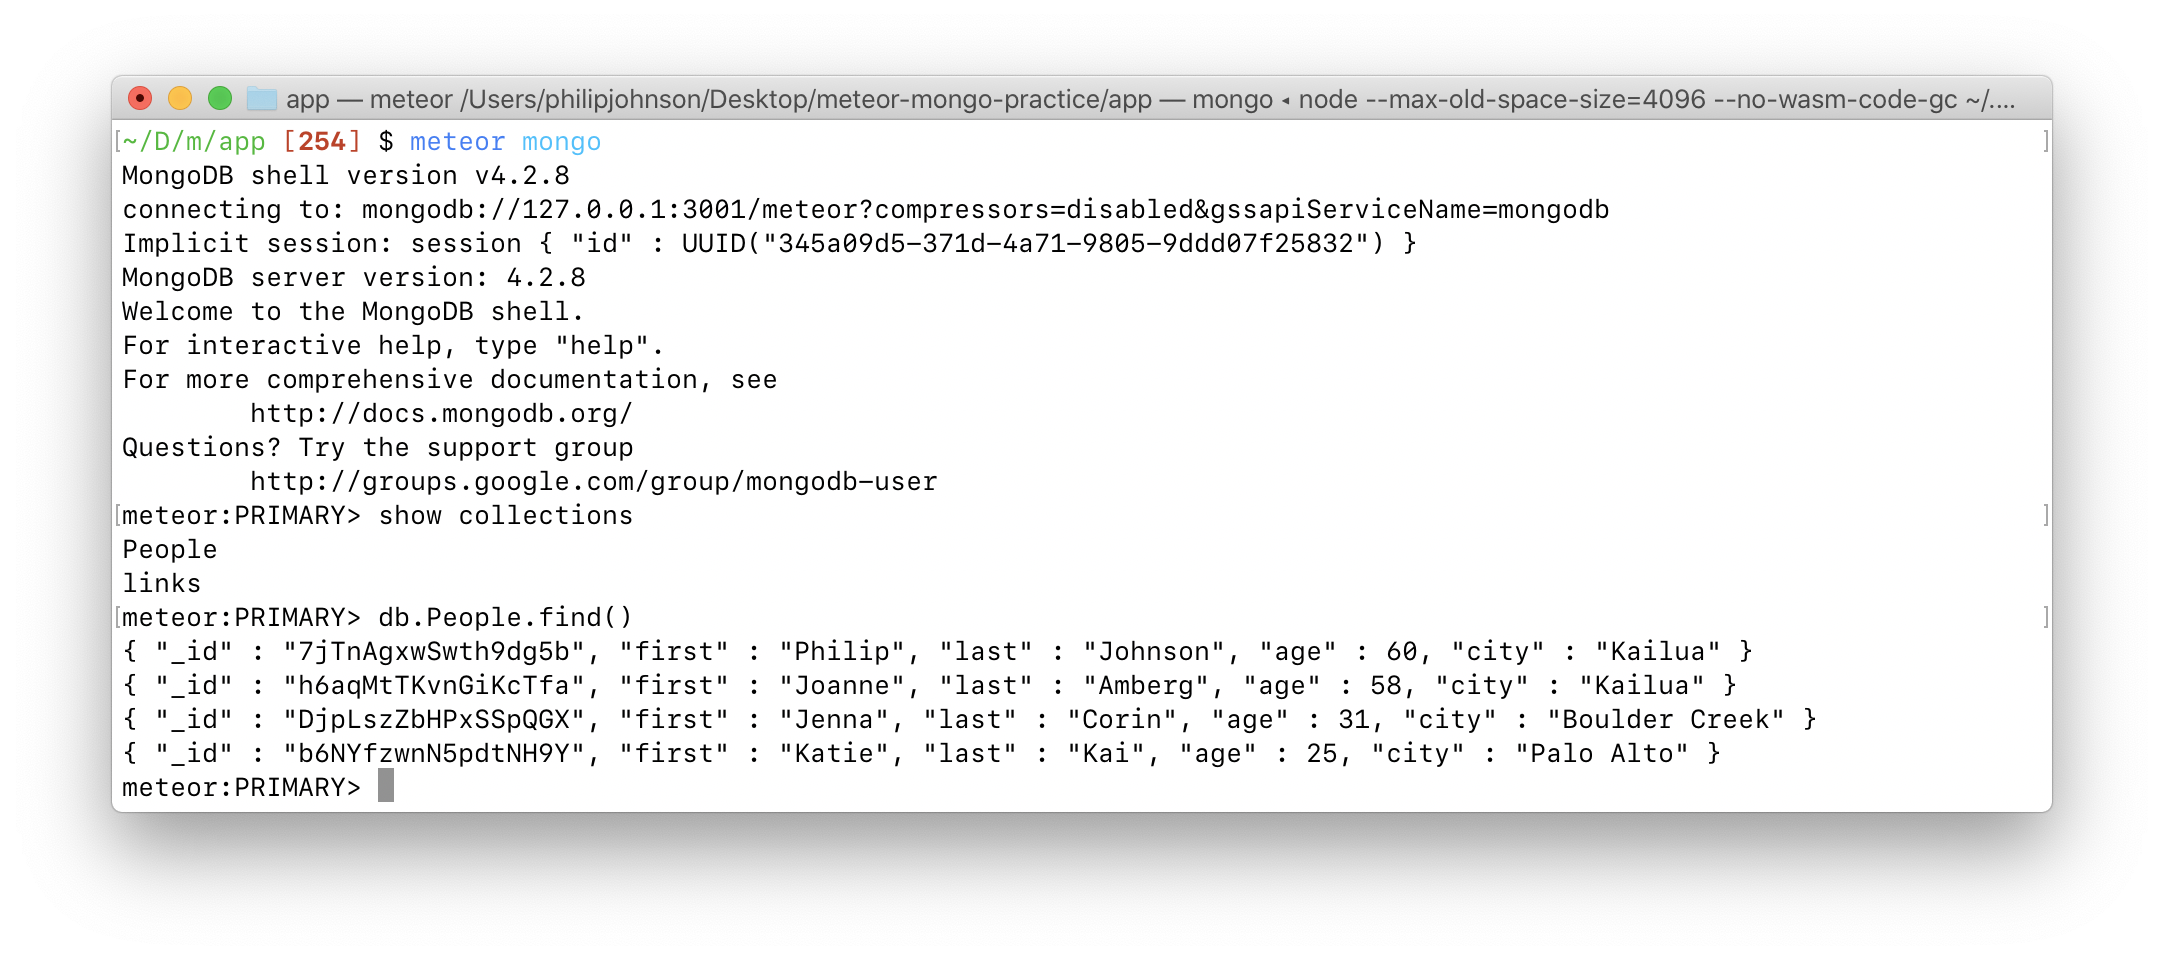
To look at the server-side MongoDB database, open up a new shell, cd into the meteor-mongo-practice/app directory, and type meteor mongo. Once the shell comes up, type show collections and then db.People.find(). Here’s what should result:
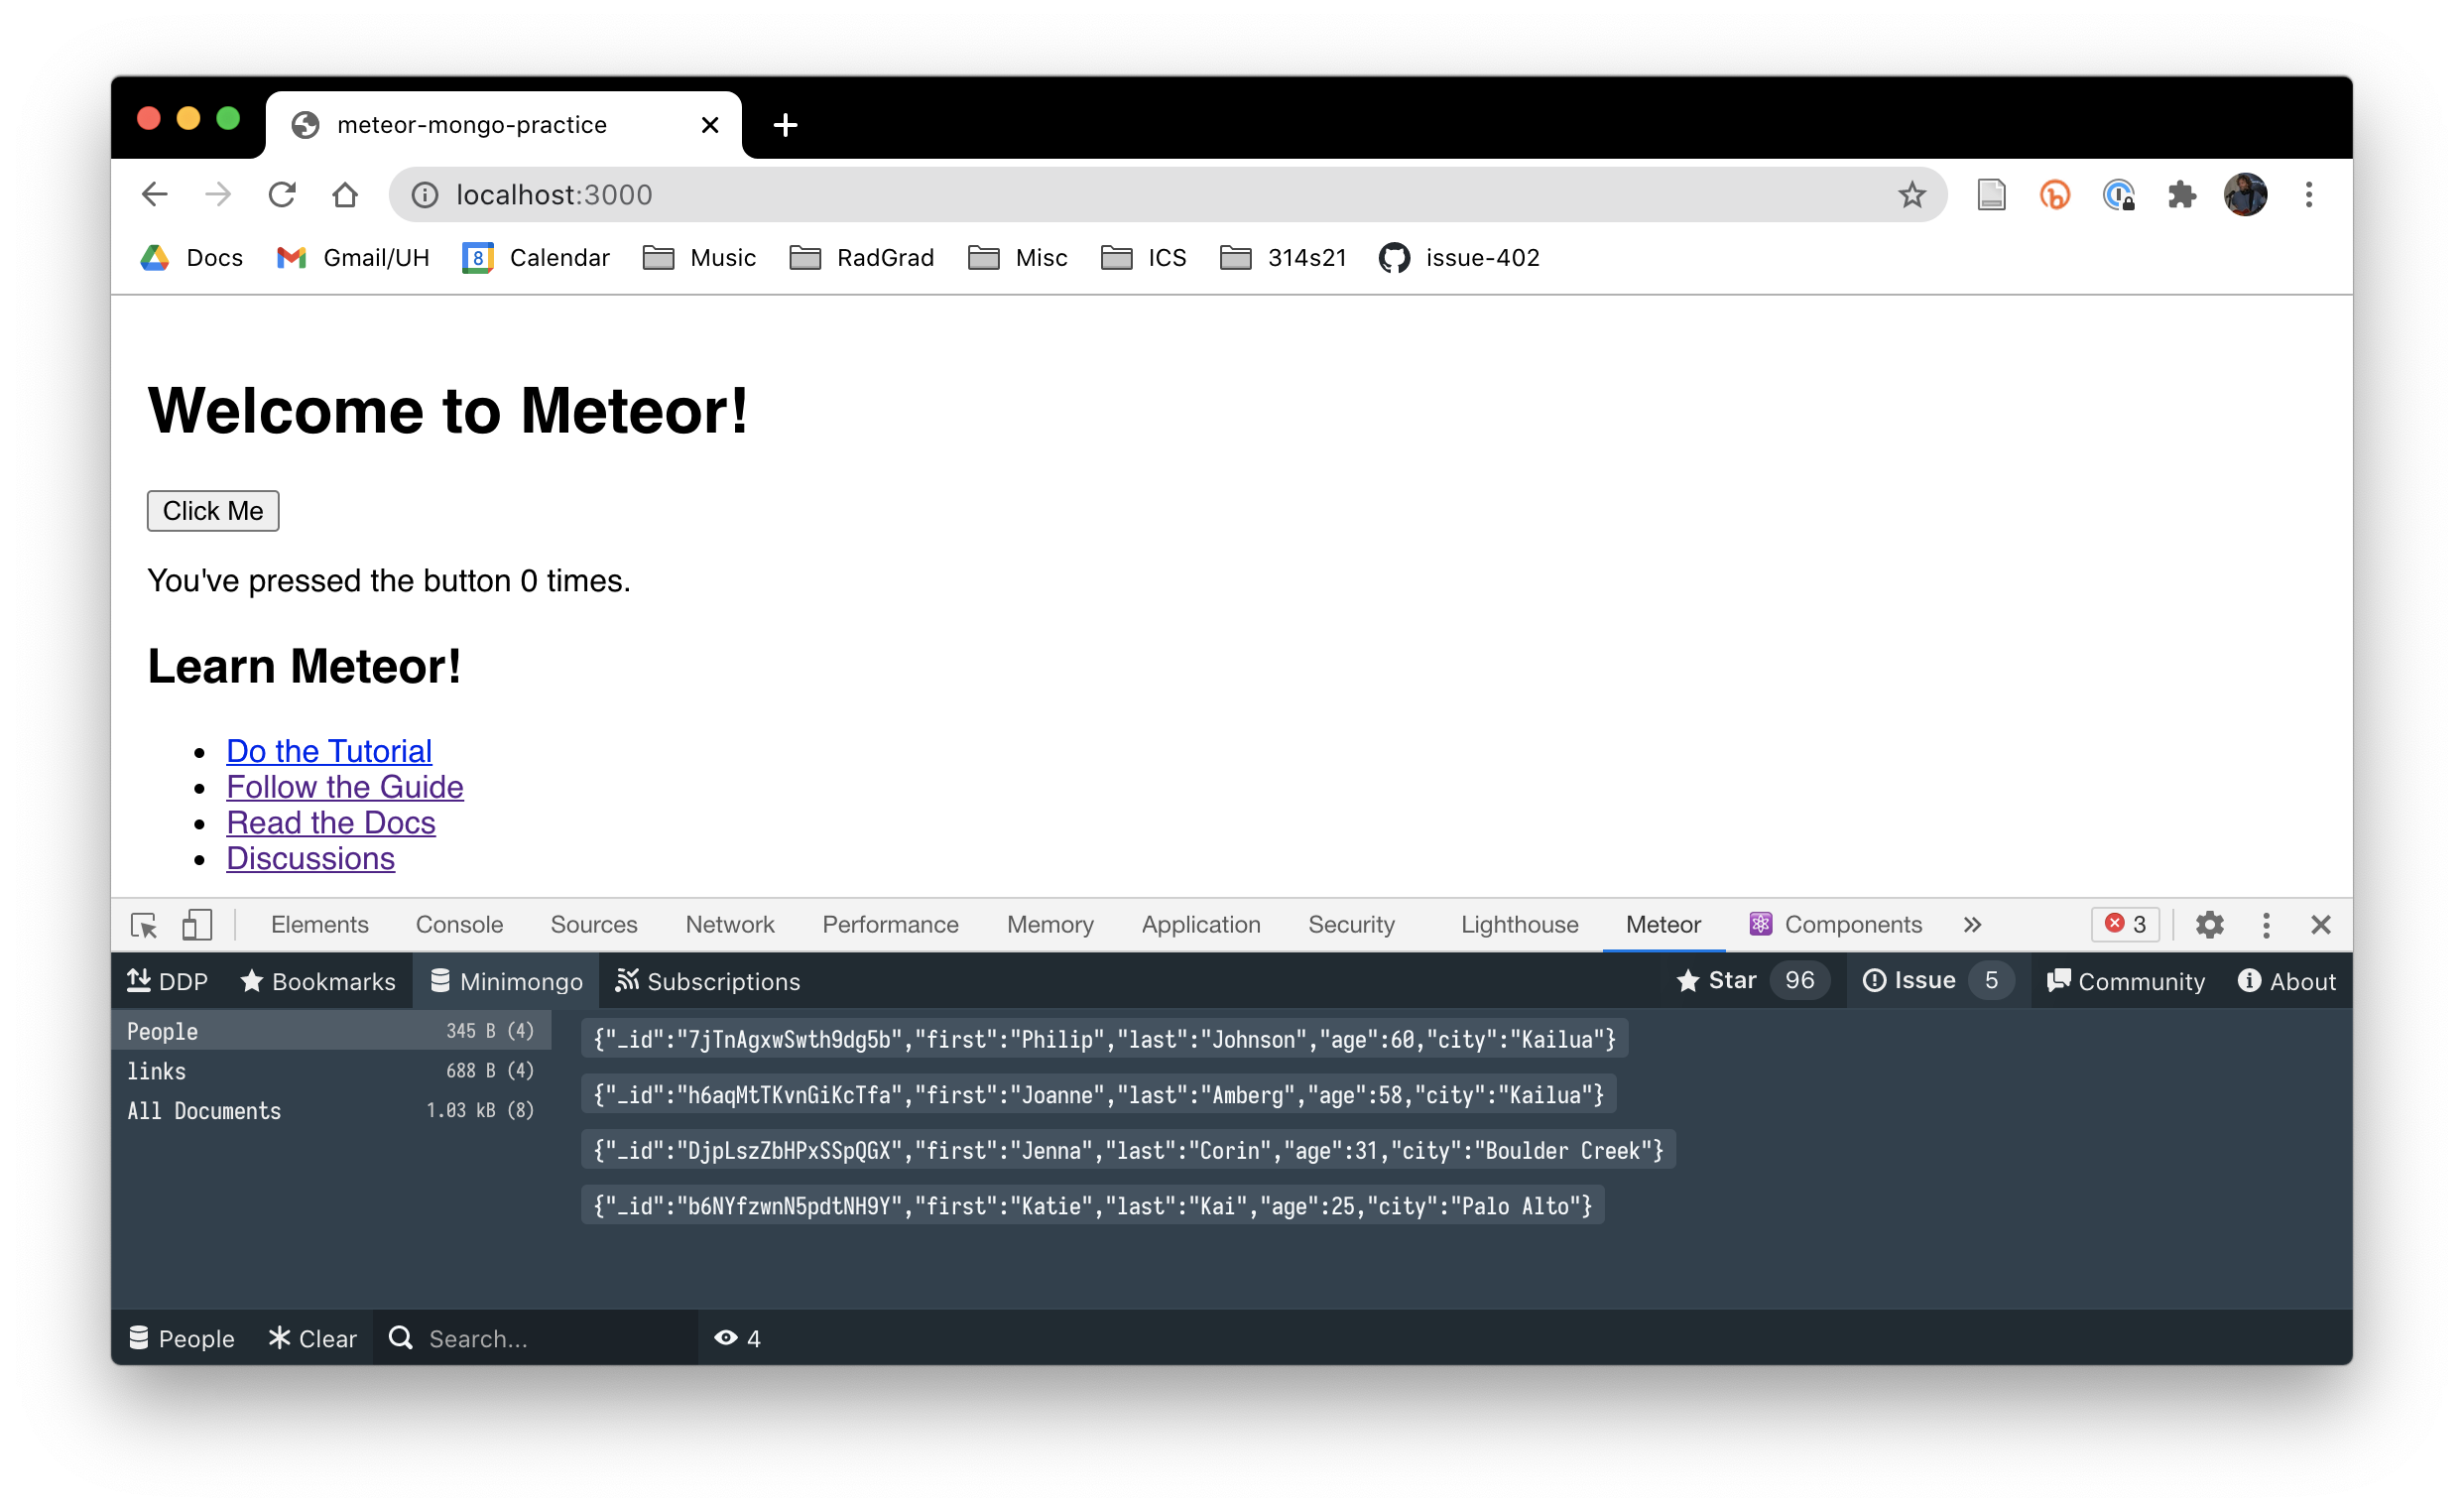
To look at the client-side MongoDB database, open up Chrome Developer tools in the window that is showing http://localhost:3000, and click to the “Meteor” tab, then click on “Mini Mongo”, then click “People”. Here’s what you should see:
Task 4: Experience the effect of dynamic reloading in Meteor
Let’s say you want to add a new document to our system. Copy the following line and add it to the end of the file in PeopleInitialization:
PeopleCollection.insert({ first: 'Doris', last: 'Johnson', age: 93, city: 'Naples' });
Now press command-S (on Mac) to save the file. In the Meteor console, you should see the system restarting, with a message “Meteor server restarted”.
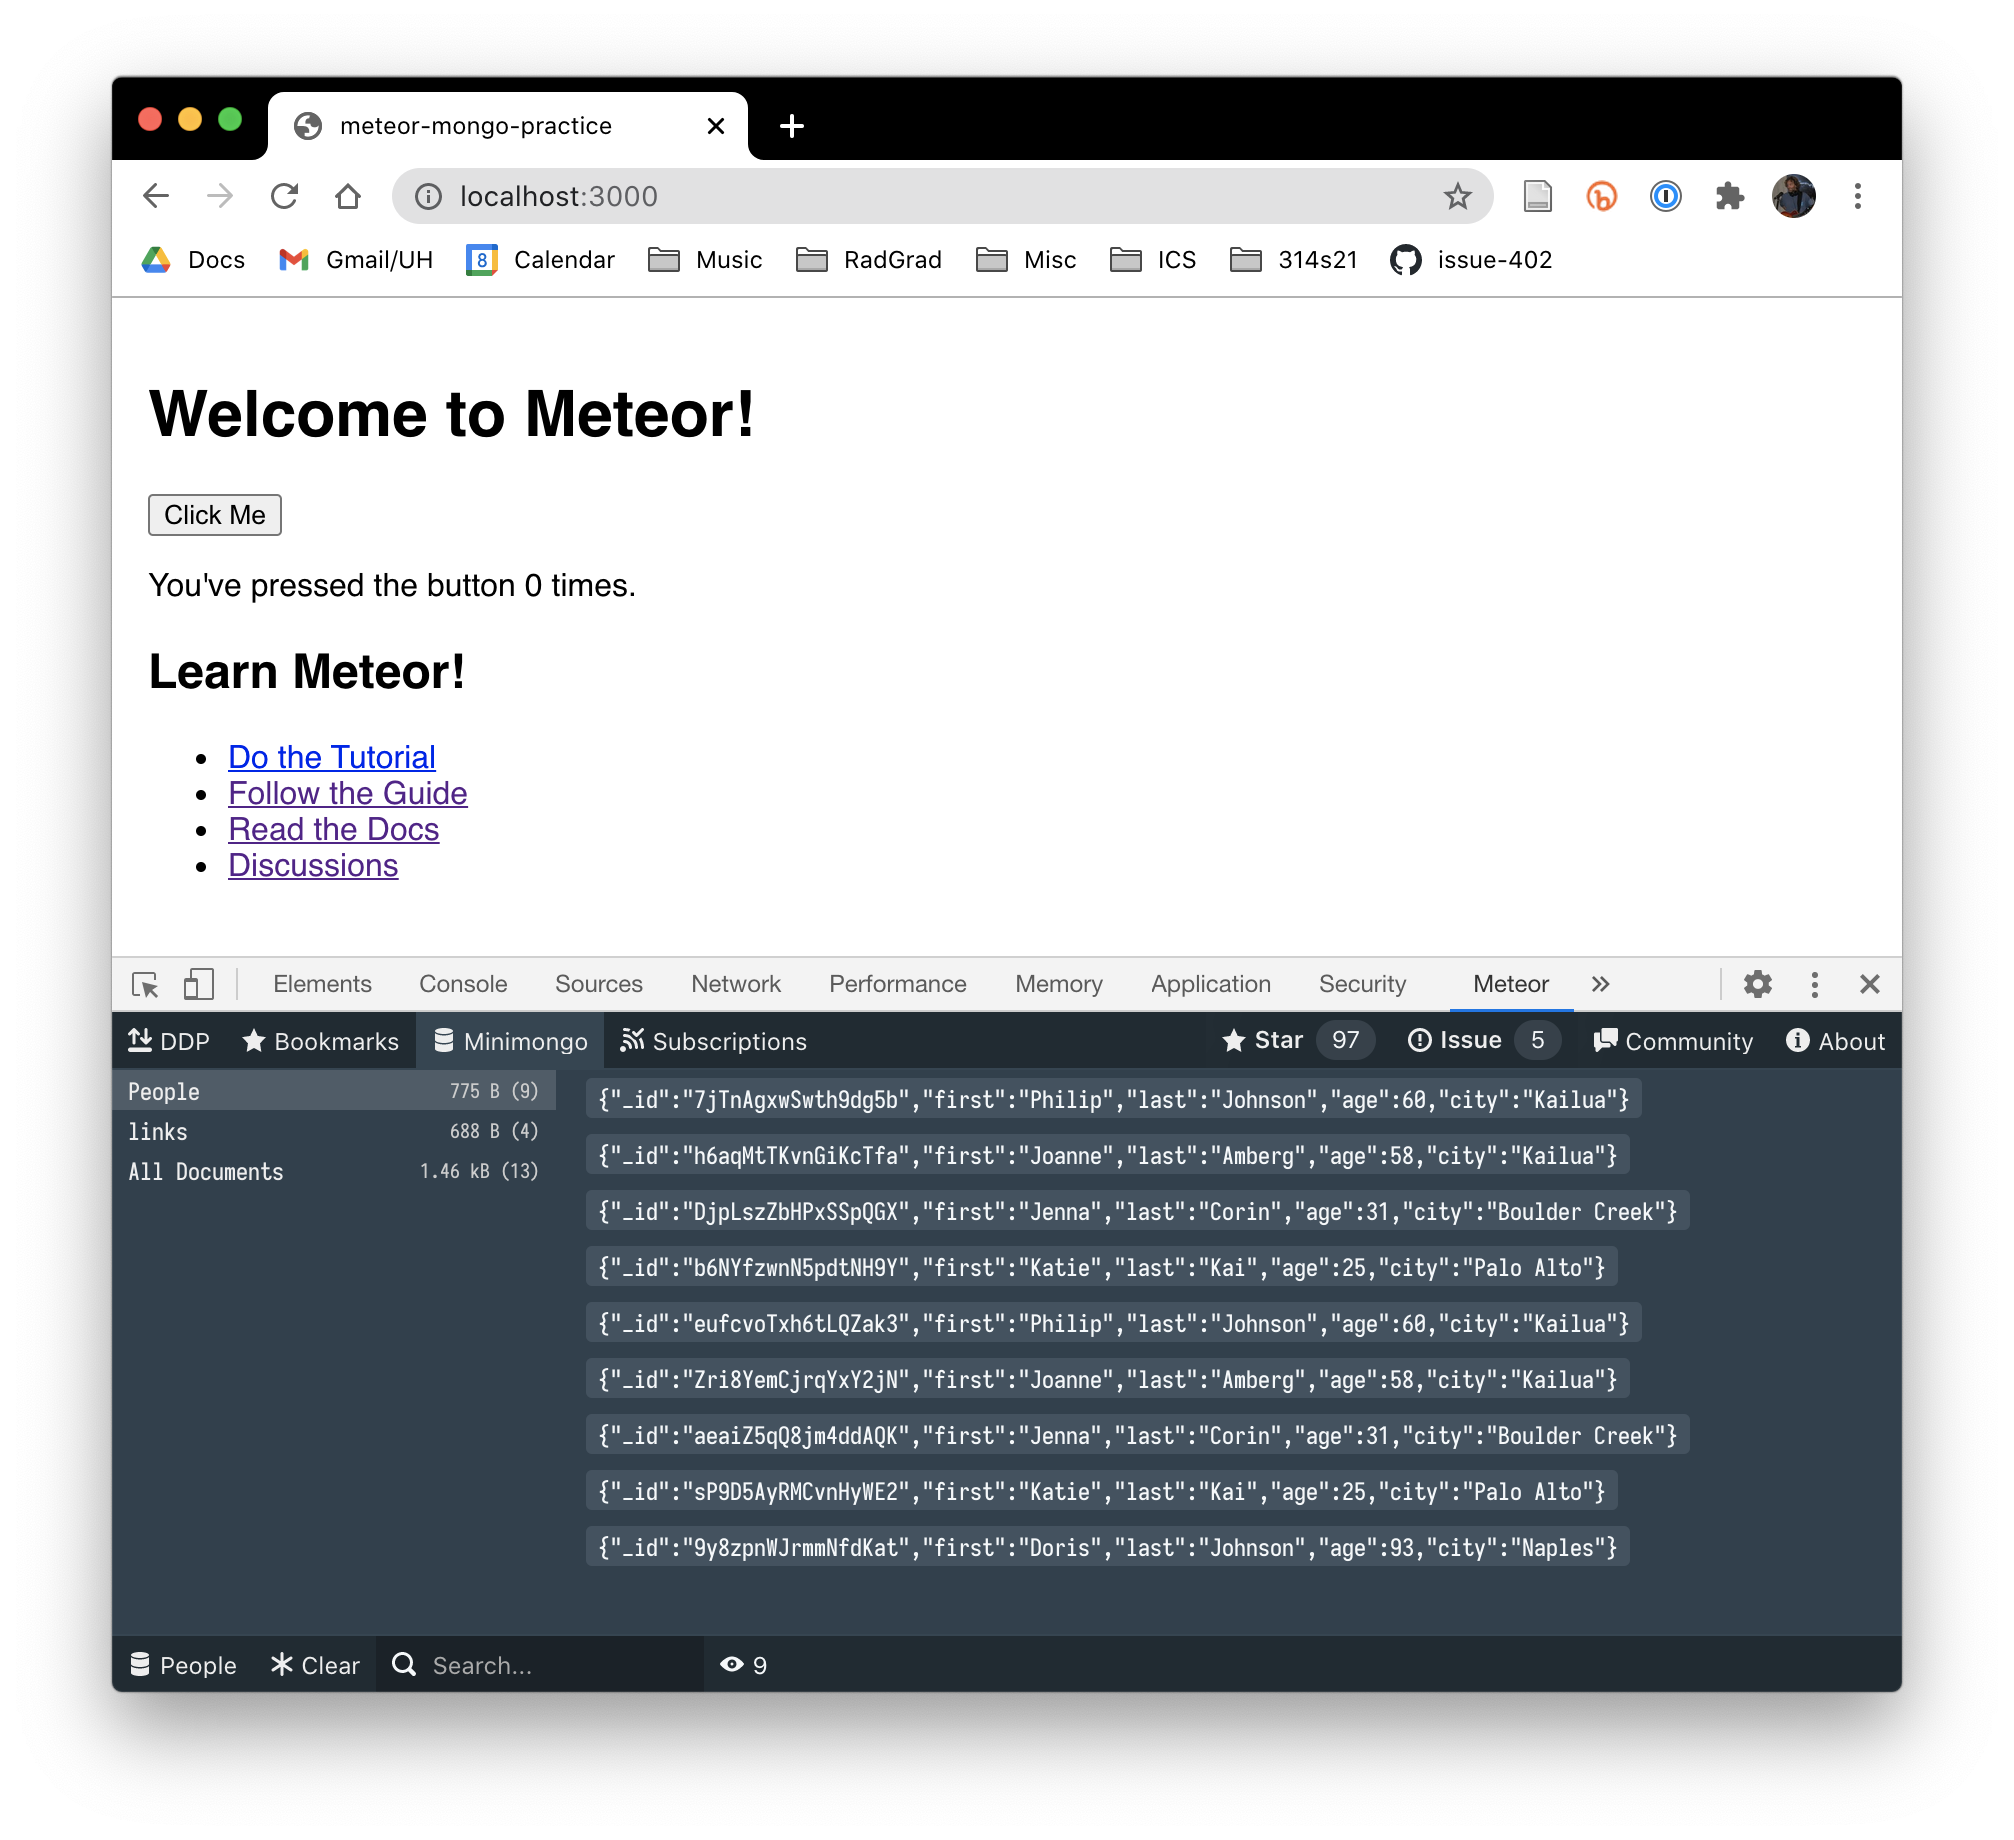
Now if you look in either the client or server Mongo databases, you’ll see that there are 9 documents, not five!
This is because we reloaded the PeopleInitialization.js file, and when we did that, we defined five new documents on top of the four that already existed. If you inspect the documents in Chrome Developer Tools, you’ll see that there are two copies of documents for Philip, Joanne, Jenna, and Katie, plus a single new one for Doris.
Dynamic reloading is a great help during development, since you can make changes to your code and see the results quickly. However, this is certainly not the behavior we want!
Task 5: Create “initialization” code and reset the database
One way to solve this problem is to specify that these “initial” inserts should be done only when the collection is empty. We can do that by changing the contents of the PeopleInitialization file to this:
import { PeopleCollection } from '../imports/api/PeopleCollection.js';

if (PeopleCollection.find().count() === 0) {
  PeopleCollection.insert({ first: 'Philip', last: 'Johnson', age: 60, city: 'Kailua' });
  PeopleCollection.insert({ first: 'Joanne', last: 'Amberg', age: 58, city: 'Kailua' });
  PeopleCollection.insert({ first: 'Jenna', last: 'Corin', age: 31, city: 'Boulder Creek' });
  PeopleCollection.insert({ first: 'Katie', last: 'Kai', age: 25, city: 'Palo Alto' });
  PeopleCollection.insert({ first: 'Doris', last: 'Johnson', age: 93, city: 'Naples' });
}
As you can see, we now check that the PeopleCollection is empty before doing any inserts. (For more details, see the find() and count()) documentation.
To see if things work correctly, we first have to reset our application’s database. To do that, control-c to stop the running application, then invoke meteor reset. The reset command re-initializes the data. For more information, see the reset command documentation.
Now if you run meteor run, you should find that the database has just five elements in it, and that if you add a space to a file and save (forcing a restart), the number of documents does not change.
Task 6: Commit your code to GitHub
When you have finished this exercise, commit your code to GitHub. This is the way we can check that you carried out the instructions in this assignment. It also provides sample code for you to look at in future to remind yourself of how Meteor and Mongo work together.
Summary
If you’ve followed along, you should now have a basic idea of how Meteor and Mongo work together. In brief:
-
Define a variable that is bound to your Meteor collection in a directory that will be loaded on both client and server. Use this variable to manipulate your collection whether the manipulation occurs on the client-side or on the server-side.
-
You can initialize collections with documents by running code on the server-side that inserts documents. Since Meteor synchronizes the client and server-side databases, these documents will be available on both the client and server side.
-
Use
meteor resetif you need to reset your application’s database to the empty state.
Submission instructions
By the time and date indicated on the Schedule page, submit this assignment via Laulima. To submit, please provide the URL to your GitHub repository.
This is not a practice WOD, so you do not have to time yourself.
You must now grant read access to this repo to the TA for your section. To do this:
- Retrieve your repository in a browser, then click on “Settings”. Depending upon the GitHub UI you are provided, you’ll then click on either “Collaborators” or “Manage Access”. Let us know if you can’t find either of these.
- Search for “bsogata”, then click “Add collaborator”.
