E34: BrowserHistory with Semantic UI
Prior to starting this WOD, you should merge your ‘columns’ branch from BrowserHistory3 back into master.
Also, be sure to have gone through the Semantic UI Hello World reading.
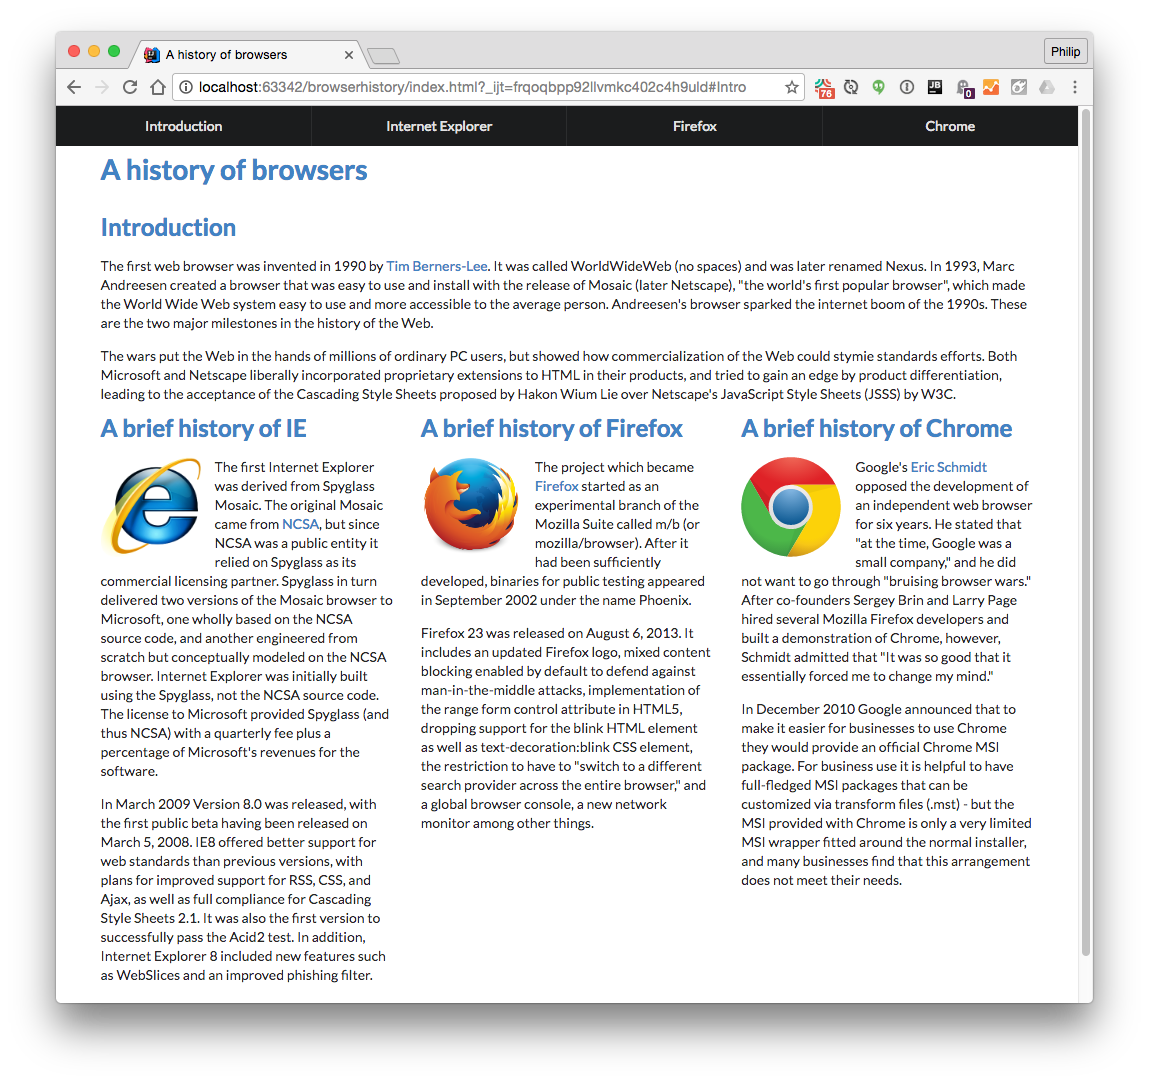
In this WOD, you will use Semantic UI to create a three column layout and a navbar. When finished, it should look like this (click to see full size):
The WOD
-
Start your timer.
-
Create a branch off your local browserhistory repo master branch called ‘semantic-1’, and checkout that branch locally. You will do your work for this WOD in that branch. (If you are doing it for the second time, name it ‘semantic-2’.)
-
You will not use LiveReload for this WOD. Instead, use the Chrome Preview facility within IntelliJ IDEA
-
Load the Semantic UI and JQuery files following the instructions in Semantic UI Hello World. You can delete the google fonts link element. Keep the style.css link, but delete its contents.
-
Wrap the page in a Semantic UI Container to improve the margins.
-
Convert the navigation bar into a Semantic UI Menu. The menu elements should link to the appropriate places in the text as before. Use the “fixed top inverted four item menu” classes.
-
You’ll notice that the page title is now hidden under the menu. Add 50px of margin to the body element to make the page title visible.
-
You’ll now notice that the page title font’s color is black, while the other section titles are blue. Figure out the hexadecimal code for that blue color, then style the title to match that color.
-
Use Semantic UI Image to float the three logos. Try “ui floated left image”.
-
Use Semantic UI Grid to put the three browser descriptions into columns. Surround those sections with a “ui equal width grid”, then surround each interior section with a “ui column”.
-
Get rid of the extraneous divs referencing the classes from BrowserHistory3.
-
Check to see that your page looks like the screen image above.
-
Now commit your branch to GitHub, and check to see that it’s there.
-
Stop your timer and record your time. Be sure to record it, because you will need your WOD time data when you write your technical essay.
Rx: <15 min Av: 15-20 min Sd: 20-25 min DNF: 25+ min
Demonstration
Once you’ve finished doing the WOD a single time, watch me do it:
Standard WOD Caveats
You’ll learn significantly less from watching me solve the WOD if you haven’t attempted the WOD yourself first.
While it’s an achievement to finish the WOD no matter how long it takes, you might experience “diminishing returns” if you work longer than the DNF time. Thus, it is usually strategic to stop working at the DNF time and watch my solution.
After watching my solution, I recommend that you repeat the WOD if you have not achieved at least Av performance. If so, be sure to:
- Start a new branch off master to hold the new attempt, or else delete your prior attempt so you cannot refer to it;
- Don’t look at my screencast while you WOD; and
- Reset your timer.
Feel free to keep trying until you make Rx if that’s of interest to you.
Submission Instructions
By the time and date indicated on the Schedule page, submit this assignment via Laulima.
You must grant read access to this repo to the TA for your section. To do this:
- Retrieve your repository in a browser, then click on “Settings”. Depending upon the GitHub UI you are provided, you’ll then click on either “Collaborators” or “Manage Access”. Let us know if you can’t find either of these.
- Search for “bsogata”, then click “Add collaborator”.
Your submission should contain:
-
A link to the GitHub repository created as a result of your latest attempt at this practice WOD. Make sure you include the complete URL so that I can click on it in my mailer. Note: the final commit to this repo must have been made before the submission time and date, otherwise you will not receive credit for this assignment.
-
The number of times you have attempted this practice WOD so far, and for each time, how long it took you.
You will receive full credit for this practice WOD as long as you have attempted it at least once and submitted your work on Laulima with all required data before the due date. Your code does not have to run perfectly for you to receive full credit. However, if you do not repeat each practice WOD until you can finish it successfully in at least AV time, you are unlikely to do well on the in-class WOD. To reduce the stress associated with this course, I recommend that you repeat each practice WOD as many times as necessary to achieve at least AV before its due date.
